Finally, it’s here, the final guide in my OpenPGP series. I’m sorry it took so long to post but free time has been at a premium as of late. This guide will explain how to use Thunderbird and Enigmail, which you should already have installed, to send e-mails that will give the National Security Agency (NSA) a hard time.
Before I get to the guide I want to note a couple of things. First, this guide will not explain how to add your e-mail account to Thunderbird. If you need instructions on that please see Mozilla’s guide for automatic account configuration and manual account configuration. Second, this guide will be applicable to OS X, Windows, and Linux but the screenshots will be taken from OS X as that is the primary operating system I use. With those notes out of the way let’s begin.
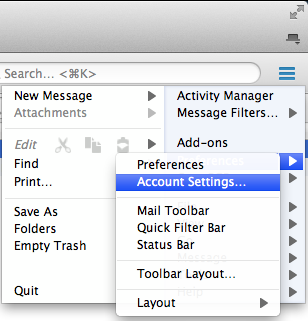
The first thing we need to do is enable OpenPGP for your account. This can be found by navigating to the menu button, selecting Preferences, and clicking on Account Settings…:
You should be looking at the Account Settings… page. From here select the OpenPGP Security item under your e-mail account:
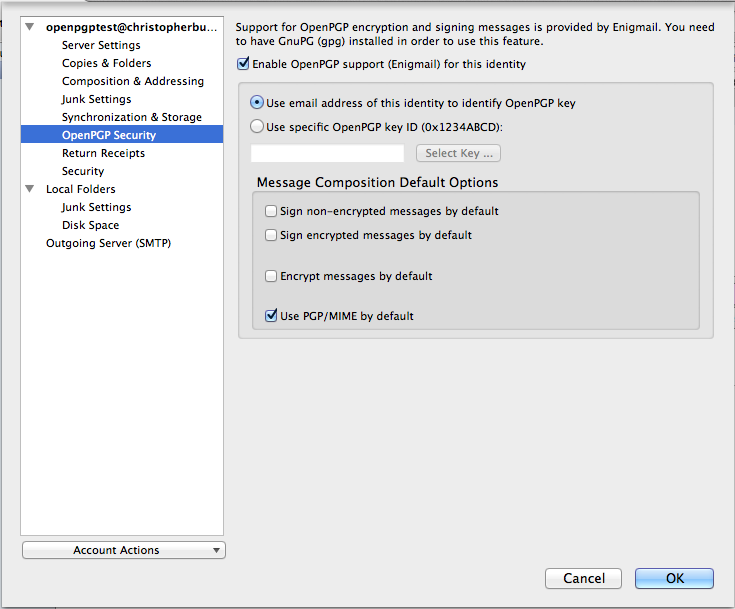
By default OpenPGP is disabled for every account. To enable OpenPGP for your account click the Enable OpenPGP support (Enigmail) for this identity check box. This will also allow you to change the options below the check box. By default Enigmail is setup to use your e-mail address to identify the OpenPGP keypair to use for your account. If you entered your e-mail address when you created your OpenPGP keypair this is the option you should selection, otherwise you’ll have to manually select a keypair.
You will also notice several check boxes under Message Composition Default Options. The check box labeled Sign non-encrypted messages by default will ensure that Enigmail cryptographically signs e-mails that you’re not encrypting. I usually select this because the cryptographic signature allows recipients of my e-mails to verify that I sent the e-mail and that the contents haven’t been altered. The check box labeled Sign encrypted messages by default does the same thing as the check box above it but for encrypted e-mails. I usually check this by default as well. Selecting Encrypt messages by default will cause Enigmail to encrypt every e-mail you send. I usually leave this option unchecked because most of the people I send e-mails to don’t have OpenPGP and therefore are unable to decrypt messages I send to them.
The last check box, which is labeled Use PGP/MIME by default, is, in my opinion, pretty useful. Normally when you send a cryptographically signed and/or encrypted message the recipient sees a blob of text. PGP/MIME puts OpenPGP signatures and encrypted content into attachments. If the recipient is using OpenPGP, and has the proper decryption key, they will see whether or not the signature is valid and be able to read the encrypted contents. On the other hand, if the recipient isn’t using OpenPGP, they will not see the signature text or the encrypted content. I check this option because the signature text and encrypted content often confuse recipients unfamiliar with OpenPGP. When this option selected, as far as the recipients without OpenPGP are concerned, the e-mail is just a regular old e-mail.
Before leaving the Account Settings… page there is one other thing you may wish to consider doing. Navigate to Composition & Addressing:
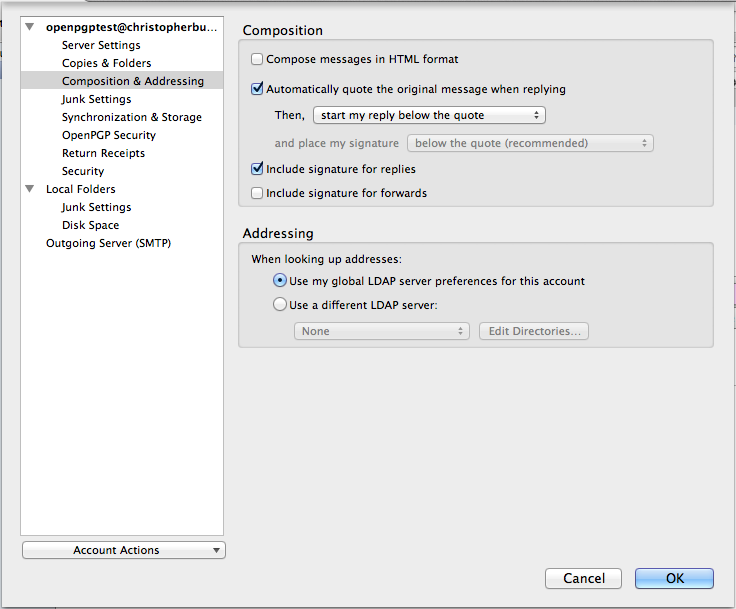
By default Thunderbird is setup to use HyperText Markup Language (HTML) formatting for e-mails. I’m not a fan of HTML formatting when it comes to e-mails and it can raise some Cain with the OpenPGP signature process. I always deselect Compose messages in HTML format. You can either leave it checked or not, it’s up to you.
Once you’ve completed your work in the Account Settings… page click the OK button; it’s time to send an e-mail. Composing an encrypted and signed e-mail with Thunderbird and Enigmail is easy. Start a new e-mail and enter the recipient, subject, and message you want to send. After you’ve done that click the arrow next to the OpenPGP button in the toolbar:
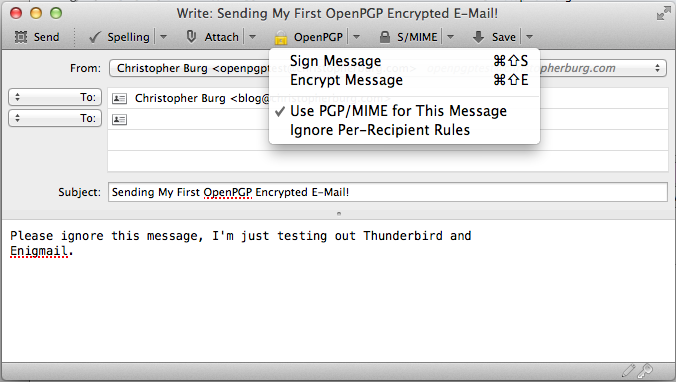
As you can see, encrypting the e-mail, if you didn’t setup Enigmail to do it automatically in the Account Settings… page, is as simple is clicking the Encrypt Message menu item. If you look at the lower right-hand corner of the e-mail composition window you’ll see a key. If the key is gray the e-mail will not be encrypted, if the key is yellow the message will be encrypted.
Now that your e-mail is setup to be encrypted it’s time to click the Send button. If you haven’t imported the recipients public key into GNU Privacy Guard or flagged the recipient’s public key as trusted you will see the following dialog:
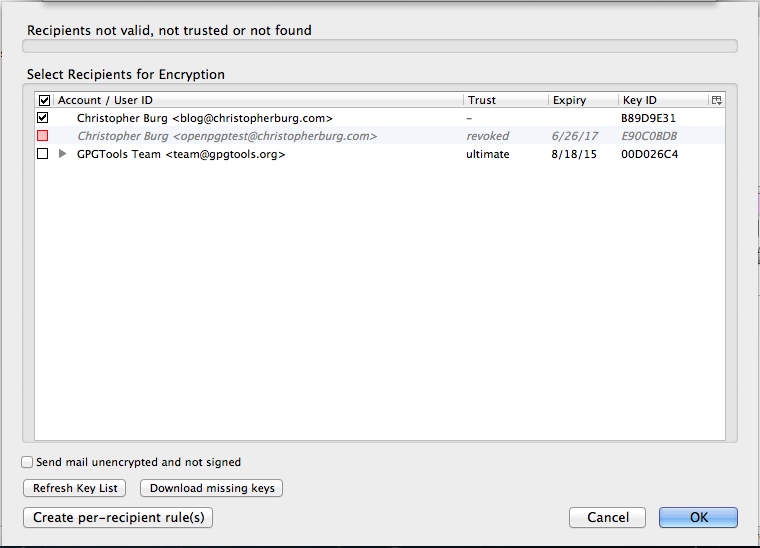
If you’ve imported the key but never flagged it as trusted just click the check box next to the recipient’s public key. You can also attempt to download the recipient’s public key from a key server if you haven’t imported it by clicking the Download missing keys button. Clicking that button will open the following dialog:
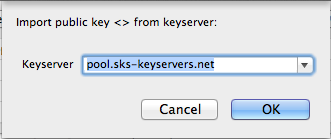
Many keyservers are setup to share public keys with each other. If the recipient has uploaded their public key to a notable server selecting the default option will stand a good chance of finding the public key you need.
Those who previously imported the recipient’s public key and flagged it as trusted won’t have to worry about the above steps. In either case you’re done. Congratulations, you’ve sent your first encrypted e-mail. Now convince your friends and family members to follow these guides so they can send you encrypted e-mails and decrypt your encrypted e-mails.
Sent you a test email to see if everything works, well 2 because part of the message was truncated in sending it the first time.
When are you going to do a post about sending encrypted mail from my government tracking device… I mean iPhone/Android Phone?
When I get around to it. I’m actually working on a project primarily aimed at teaching the use of cryptographic tools. Needless to say, it’s taking a good deal of time.