Starting Off Somewhere

I received a comment from Sonia on my post detailing Bruce Schneier’s tips for protecting yourself from the National Security Agency (NSA):

This kind of endeavor only works is everybody does it, otherwise is useless. Also inviting laymen to “learn” reveals how much you underestimate the fact that being a programmer gives you all the mental models you need.

Those people who “learn” will only end up compromising their own security under the impression that they are doing something secure.

Although I addressed these concerns in a reply I wanted to write a post because I feel what I’m about to say is relevant to anybody interested in computer security.

In another comment Sonia mentioned she (I’m assuming Sonia is female based on name, this being the Internet I could be incorrect) is a Ph.D. That being the case, I can see where her views on this subject come from. Oftentimes those of us who have been involved in the computer field for some time fall victim to two issues. First, we develop a form of elitist attitude that causes us to think of ourselves as somehow superior to non-techie people. Second, we forget about the early days when we knew little about computers. I’ve fallen victim to these issues before and I believe Sonia has fallen victim to them in her comment.

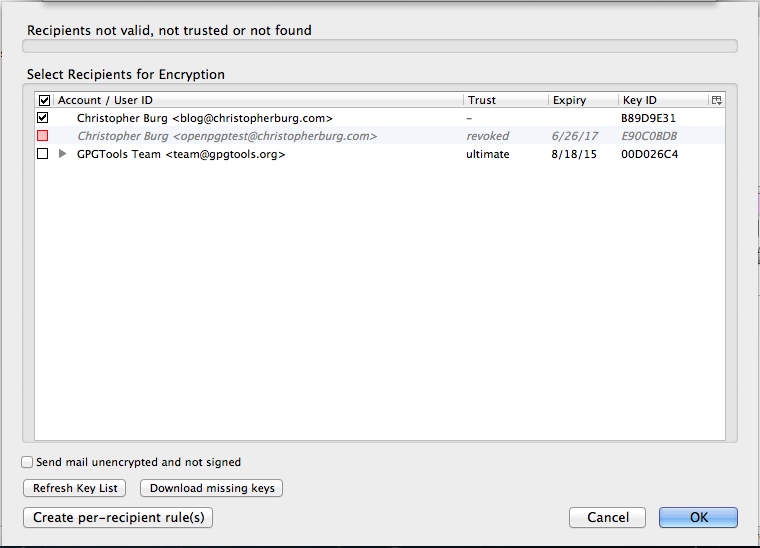
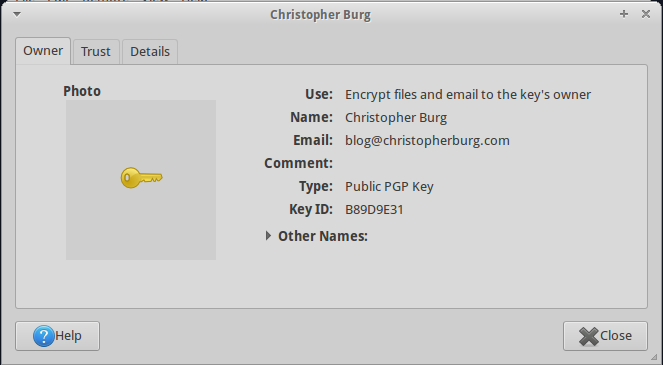
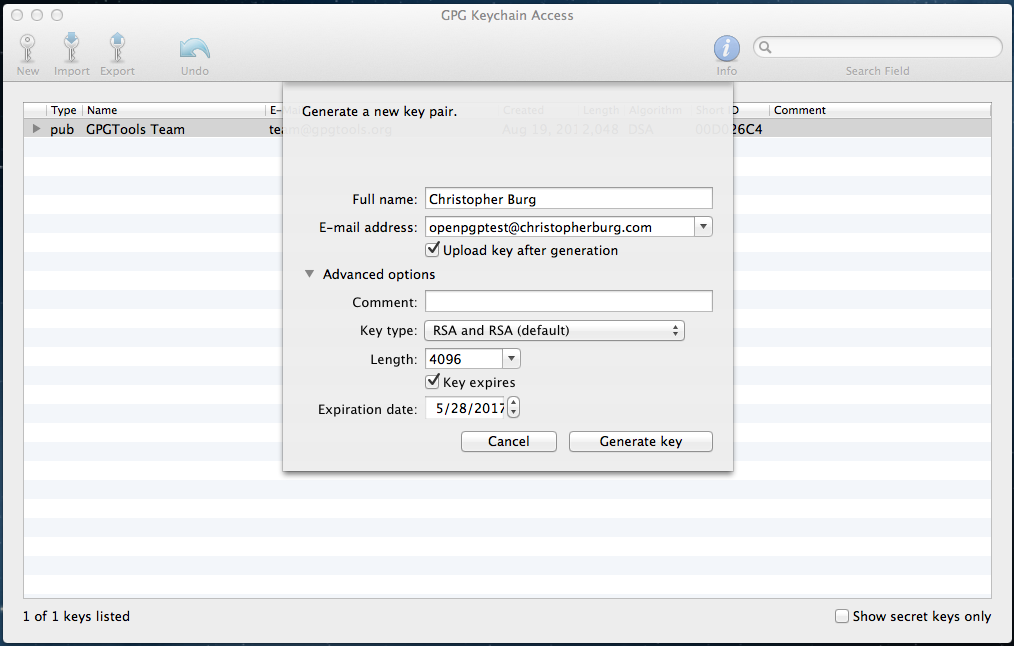
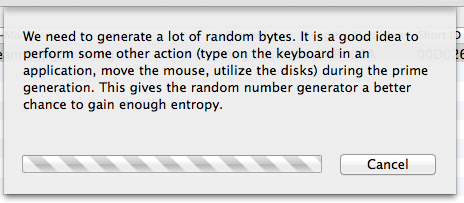
She does make a very important point. When you first dive into computer security you’re going to make mistakes. This is a problem all people face when learning something new. Just because you know how to utilize OpenPGP to encrypt your e-mail doesn’t mean you fully grasp underlying concepts such as private key security, the inability to know whether or not a closed system is secure, the value of a proper security audit, or the potential issue of generating keypairs on a system that lacks a true cryptographically secure pseudorandom number generator. All of these things, and more, play a part in OpenPGP and computer security.

You know what? That’s OK. You don’t need to know everything right away. Everybody has to start from the beginning. I didn’t become a computer programmer or system administrator overnight. I wasn’t blessed with the innate knowledge required to operate and manage an OpenBSD system. At one point I had no idea what Postfix was, let alone how to run and maintain a Postfix server. The difference between C and C++ were unknown to me back in the day. All of this knowledge came with due time. I’ve invested years into learning what I now know about computers and will likely invest a lifetime into learning more. When I started to program I made countless amateur mistakes. That didn’t discourage me because I learned from those mistakes. I’m happy to report that I’m still learning from my mistakes today.

Learning how to use the tools necessary to keep yourself safe online isn’t going to happen overnight. You’re going to make mistakes. Those mistakes will compromise your security. But you will learn from those mistakes and you will become more secure because of it.

Computer security isn’t an all-or-nothing thing. Even if you don’t practice proper private key security or generate an easily determinable keypair because your system lacks a secure pseudorandom number generator you’re more secure by using OpenPGP or Off-the-Record Messaging than not. Every encrypted communication requires potential spies to throw time and resources at decrypting it just to find out what’s in it. Simply put, every encrypted communication helps defend everybody’s privacy. As the number of encrypted communications increase potential spies must either prioritize the computing resources available to them or invest other resources into more computing resources.
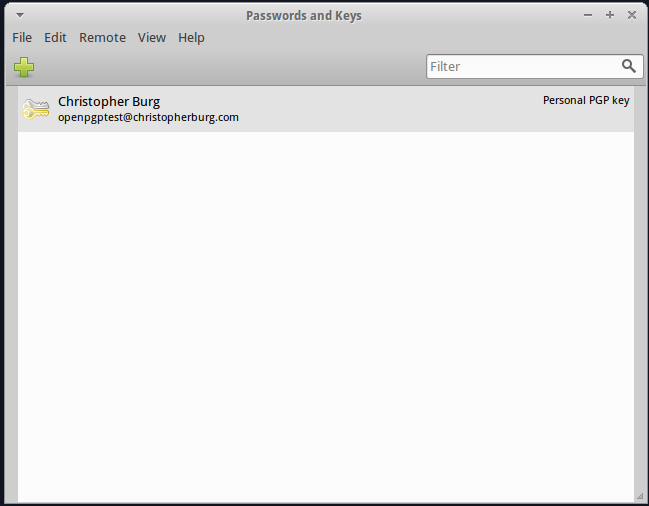
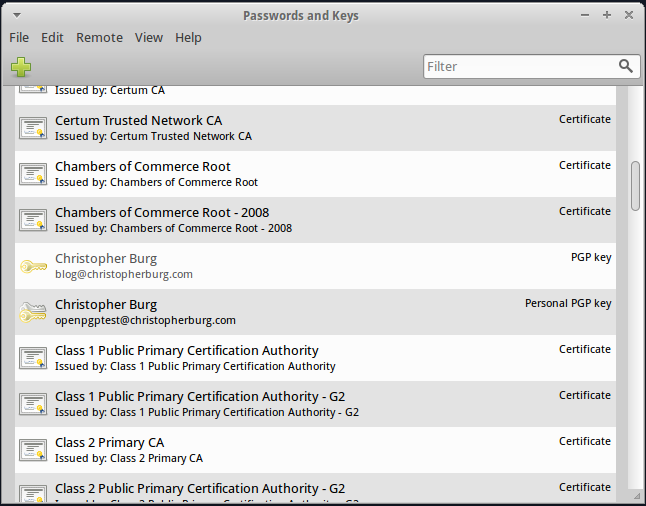
Bitmessage

Since I just spent a post bitching about the ineffectiveness of e-mail I think it’s time to discuss alternatives. In my pursuit to find methods of secure communications I’ve stumbled across an interesting piece of software called Bitmessage. Bitmessage caught my attention because it attempts to fulfill several goals I have when looking for an e-mail replacement. First, it’s decentralized. There are no central servers running the Bitmessage network. Instead the Bitmessage network is similar to Bitcoin in that messages are broadcast (in an encrypted form) throughout the entire network.

The second feature that interests me is Bitmessage’s pseudo-anonymity.Bitmessage, like Bitcoin, is based off of public-key cryptography. Users create a keypair and the public key is hashed, which gives you an identifier that others can use to communicate with you. All message sent to you are encrypted with your public key so only you, the holder of the private key, can decrypt and read them.

That leads me to the third feature of Bitmessage that interests me, an attempt to use strong cryptography. All messages in the Bitmessage network are encrypted using public-key cryptography. That makes snooping on communiques extremely difficult. One of the weaknesses I’ve noted in most potential e-mail replacements is a tendency to send communiques in plain text. Most instant messenger servers, for example, send all message in plain text so anybody can easily listen in.

Bitmessage isn’t perfect by a long shot. The software is obviously in an alpha stage. I could only find a pre-built Windows client on Bitmessage’s website and an unofficial pre-built OS X client after some digging. Installing Bitmessage is probably more work than most people want to go through. Another problem with Bitmessage is that no independent security audit has been performed on the network or the client (although a request for such an audit is on the front page of Bitmessage’s wiki). Without a security audit there is no way to know how secure Bitmessage really is. But these are problems that plague every new piece of software. One should approach Bitmessage as a proof of concept that promises to deliver great things in the future.

If you’re interested in testing Bitmessage with me my address is BM-2D95ncE8da721wVxQzcA3QEhjrg2MGFjka.

Considerations Regarding Encryption: Cost to Benefit Analysis

Since I began advocating crypto-anarchy I’ve met a surprising amount of resistance from an unexpected group. Many of my fellows in the liberty movement have taken a defeatist approach to technology. Now that they know that the National Security Agency (NSA) is scooping up every data packet it can get its grubby hands on, an almost Luddite-esque sect has developed in the liberty movement. They believe that the Internet, and all forms of electronic communications, should be avoided because they feel that no force on Earth can stand up to the power of the federal government (an ironic attitude from a movement that advocates standing up to the federal government). These people have become critical of advocating cryptographic and anonymizing tools to protect against unwanted spying.

One of the criticisms they often raise is that the NSA can simply decrypt whatever data it captures. This belief partially stems from the belief that the state is omnipotent and partially from misunderstanding the purpose of encryption. In this post I plan to briefly address the latter (I believe I’ve sufficiently addressed the former in my extensive posting history).

Encryption isn’t a magic bullet that will prevent unauthorized individuals from reading your data for all eternity. It is a tool that stands to greatly delay an unauthorized individual from reading your data. Anything that has been encrypted can be decrypted. If that wasn’t he case then encryption would be useless as it would prevent unauthorized and authorized individuals from reading the data. There are numerous ways to decrypt encrypted data.

The first, and most obvious, method is getting a copy of the decryption key. In order to allow authorized individuals to read encrypted data there has to be a way to legitimately decrypt it. This is done by giving authorized individuals decryption keys. Decryption keys can take many forms including a pre-shared key that is known to both you and other authorized individuals and asymmetric keypairs, one of which is secret and (ideally) known only to you and another which is public.

The second method is brute force. A brute force attack, in regards to cryptography, involves trying every possible decryption key. While this method will eventually decrypt encrypted data, it’s very time consuming if proper cryptographic algorithms and practices are used. Depending on the amount of computational power available, decrypting the data via brute force may take years, decades, or (possibly) centuries. In other words, brute force attacks are expensive.

The third method is to exploit the encryption algorithm itself. This method is cheaper than brute force but it depends on finding an exploitable vulnerability in the algorithm used to encrypt the data. Depending on the algorithm used, this method can decrypt encrypted data very quickly or it can be impossible (at least for the time being).

Humans always perform a cost to benefit analysis before taking an action. The state is no different. While the NSA, theoretically, has a tremendous amount of computing power available to it, using that computing power isn’t free. Computing power requires time and electricity. So long as you have computers dedicated to decrypting one set of data you can’t dedicate them to decrypting other sets of data. It’s unlikely that the NSA is using brute force to decrypt every encrypted set of data it has intercepted. Instead, it is likely using brute force only after it has decided to target an individual.

Algorithm exploits are another concern. Many people believe that the NSA has exploits that allow it to decrypt data encrypted by every known algorithm. Those people often believe that the NSA also has backdoor access to every electronic device (which would make the former mostly irrelevant). Such knowledge still requires a cost to benefit analysis. While the cost in time an electricity is very low the cost in revealing that it has an exploit is very high. Let’s say you encrypted your hard drive with AES-256 and the NSA had an exploit that allowed it to decrypt the drive. Now that it has that information it can use it to target you but, in so doing, it would have to reveal how it obtained that information. In other words, it would have to explain to a court that it has an exploit that allows it to decrypt AES-256 (many people may point out that they don’t have to give you a trail if they whisk you off to Guantanamo Bay, to which I would point out that they wouldn’t need evidence of wrongdoing either). After that information was revealed everybody wanting to hide information from the NSA would encrypt their information with a different, hopefully more secure, algorithm. Unless the NSA knows what algorithm its intended targets decided to use and had an exploit for that algorithm it would have effectively tossed away its most effective tool to get one person. The same risk applies to revealing information about backdoors installed in systems. That’s a tremendous cost.

That leaves us with the method of obtaining the decryption key. This is, most likely, the cheapest option for the NSA to use if it wants to target a specific individual. Even if an individual is unwilling to voluntarily provide their decryption key the NSA can always resort to rubber-hose cryptanalysis. Rubber-hose cryptanalysis relies on the use of coercion to get a decryption key from a target. An example of this method being was a woman in Colorado who was held in contempt of court for refusing to decrypt her hard drive. By holding her in contempt until she decrypted her hard drive the state gave her an ultimatum: either rot in prison indefinitely or face the chance of rotting in prison if incriminating evidence is found on the decrypted hard drive. Another way to use rubber-hose cryptanalysis is physical force. If you torture somebody long enough they will almost certainly surrender a decryption key. I will point out that an agency willing to torture an individual to retrieve a decryption key is unlikely to concern itself with retrieving evidence in the first place so the point would be moot.

Looking at the costs associated with the above mentioned decryption methods we can develop a rudimentary cost to benefit analysis. In most cases, for the state, the cheapest option is to simply get the decryption key from the user. Holding somebody in concept of court for refusing to surrender their decryption key has a positive (for the state) side effect: the person is detained until they provide the decryption key. Such a case is win-win for the NSA because keeping you in a cage also takes you out of the picture. Brute force would likely be resorted to if the NSA was interested enough in decrypting the data that it would be willing to take the time and front the electrical cost of throwing a good amount of computing power at the task. In other words, it is unlikely to brute force every encrypted piece of data. Instead, it would likely use brute force only after it has decided to specifically target an individual. The only time the NSA would resort to an algorithm exploit (if it has one), in my opinion, is if the data is needed immediately and the consequences of any delay would be very high.

There are no magic bullets in security. Encrypting your data won’t prevent unauthorized individuals from reading it for all time. But encrypting your data raises the cost of reading it, which will likely deter fishing expeditions (decrypting all data and selecting people to target based on the decrypted information). By encrypting your data you will likely remain under the radar unless the NSA has some other reason to target you. If that is the case it won’t matter if you use modern technology or not. Once you’re a target the NSA can use old fashioned surveillance methods such as bugging your dwelling or dedicating an individual to follow you around. There is no sense in handicapping yourself in order to avoid Big Brother. Big Brother can watch you whether your use a cell phone or only communication with individuals in person. If you use the best tools available you can enjoy almost the same level of security using modern communication technology as you enjoy when having face-to-face discussions.

Encrypt Everything: Sending OpenPGP Encrypted E-Mails with Thunderbird and Enigmail

Finally, it’s here, the final guide in my OpenPGP series. I’m sorry it took so long to post but free time has been at a premium as of late. This guide will explain how to use Thunderbird and Enigmail, which you should already have installed, to send e-mails that will give the National Security Agency (NSA) a hard time.

Before I get to the guide I want to note a couple of things. First, this guide will not explain how to add your e-mail account to Thunderbird. If you need instructions on that please see Mozilla’s guide for automatic account configuration and manual account configuration. Second, this guide will be applicable to OS X, Windows, and Linux but the screenshots will be taken from OS X as that is the primary operating system I use. With those notes out of the way let’s begin.

The first thing we need to do is enable OpenPGP for your account. This can be found by navigating to the menu button, selecting Preferences, and clicking on Account Settings…:

You should be looking at the Account Settings… page. From here select the OpenPGP Security item under your e-mail account:

By default OpenPGP is disabled for every account. To enable OpenPGP for your account click the Enable OpenPGP support (Enigmail) for this identity check box. This will also allow you to change the options below the check box. By default Enigmail is setup to use your e-mail address to identify the OpenPGP keypair to use for your account. If you entered your e-mail address when you created your OpenPGP keypair this is the option you should selection, otherwise you’ll have to manually select a keypair.

You will also notice several check boxes under Message Composition Default Options. The check box labeled Sign non-encrypted messages by default will ensure that Enigmail cryptographically signs e-mails that you’re not encrypting. I usually select this because the cryptographic signature allows recipients of my e-mails to verify that I sent the e-mail and that the contents haven’t been altered. The check box labeled Sign encrypted messages by default does the same thing as the check box above it but for encrypted e-mails. I usually check this by default as well. Selecting Encrypt messages by default will cause Enigmail to encrypt every e-mail you send. I usually leave this option unchecked because most of the people I send e-mails to don’t have OpenPGP and therefore are unable to decrypt messages I send to them.

The last check box, which is labeled Use PGP/MIME by default, is, in my opinion, pretty useful. Normally when you send a cryptographically signed and/or encrypted message the recipient sees a blob of text. PGP/MIME puts OpenPGP signatures and encrypted content into attachments. If the recipient is using OpenPGP, and has the proper decryption key, they will see whether or not the signature is valid and be able to read the encrypted contents. On the other hand, if the recipient isn’t using OpenPGP, they will not see the signature text or the encrypted content. I check this option because the signature text and encrypted content often confuse recipients unfamiliar with OpenPGP. When this option selected, as far as the recipients without OpenPGP are concerned, the e-mail is just a regular old e-mail.

Before leaving the Account Settings… page there is one other thing you may wish to consider doing. Navigate to Composition & Addressing:

By default Thunderbird is setup to use HyperText Markup Language (HTML) formatting for e-mails. I’m not a fan of HTML formatting when it comes to e-mails and it can raise some Cain with the OpenPGP signature process. I always deselect Compose messages in HTML format. You can either leave it checked or not, it’s up to you.

Once you’ve completed your work in the Account Settings… page click the OK button; it’s time to send an e-mail. Composing an encrypted and signed e-mail with Thunderbird and Enigmail is easy. Start a new e-mail and enter the recipient, subject, and message you want to send. After you’ve done that click the arrow next to the OpenPGP button in the toolbar:

As you can see, encrypting the e-mail, if you didn’t setup Enigmail to do it automatically in the Account Settings… page, is as simple is clicking the Encrypt Message menu item. If you look at the lower right-hand corner of the e-mail composition window you’ll see a key. If the key is gray the e-mail will not be encrypted, if the key is yellow the message will be encrypted.

Now that your e-mail is setup to be encrypted it’s time to click the Send button. If you haven’t imported the recipients public key into GNU Privacy Guard or flagged the recipient’s public key as trusted you will see the following dialog:

If you’ve imported the key but never flagged it as trusted just click the check box next to the recipient’s public key. You can also attempt to download the recipient’s public key from a key server if you haven’t imported it by clicking the Download missing keys button. Clicking that button will open the following dialog:

Many keyservers are setup to share public keys with each other. If the recipient has uploaded their public key to a notable server selecting the default option will stand a good chance of finding the public key you need.

Those who previously imported the recipient’s public key and flagged it as trusted won’t have to worry about the above steps. In either case you’re done. Congratulations, you’ve sent your first encrypted e-mail. Now convince your friends and family members to follow these guides so they can send you encrypted e-mails and decrypt your encrypted e-mails.

Encrypt Everything: Installing Thunderbird and Enigmail

After a longer than expected break I’m returning to the Encrypt Everything series. Previously I discussed OpenPGP and explained how to generate keypairs in OS X, Windows, and Linux. In this installment I will explain how to install the Thunderbird e-mail client and its Engimail plugin, which enables sending and receiving OpenPGP signed and encrypted e-mails. Be sure you’ve followed the previous guide for your operating system as installing GNU Privacy Guide and generating a keypair is a prerequisite. This guide will apply to OS X, Windows, and Linux.

Step one is to download a copy of Thunderbird. This can be done by going to Mozilla’s Thunderbird website, which should automatically detect what operating system you’re running and provide you with the appropriate binary. If you, like me, run NoScript then separate links for each operating system will be displayed.

OS X

If you haven’t installed GPGTools yet do so.

After GPGTools has been installed download the latest version of Thunderbird from Mozilla’s website. The file you download will be a .dmg. Double-clicking on the file will mount it and you’ll be greeted with the following window:

To install Thunderbird simply drag the Thunderbird icon over the Applications folder shortcut and release the mouse button. That’s it, Thunderbird is installed.

Windows

If you haven’t installed Gpg4win yet do so.

Once you’ve installed Gpg4win download the latest version of Thunderbird from Mozilla’s website. The downloaded file is a standard Windows installer. Double-click on it to start the installation process:

Once the installer has opened click the Next button twice followed by the Install button. Once Thunderbird is installed click the Finish button and you’re done.

Linux

GNU Privacy Guard is installed by default on many Linux distributions but you still need to generate a keypair. If you haven’t generated your keypair yet do so.

As with my previous Linux guide this guide was created using Xubuntu 13.04, which includes Thunderbird as the default e-mail client. Likewise, according to Ubuntu’s website, Thunderbird has been the default e-mail client since version 11.10. According to this guide Thunderbird is also included by default on Fedora Core.

Therefore, if you’re using any of the distributions this guide is applicable to, you already have Thunderbird installed. Wasn’t that easy?

Installing Enigmail

Now that you have Thunderbird installed you will need to install the Enigmail plugin. Doing so is simple thanks to Thunderbird’s built-in ability to find and install plugins. The following steps apply to OS X, Windows, and Linux. Screenshots will be taken on an OS X virtual machine because it is my default operating system.

First, if you are running OS X or Linux, go to the Tools menu and click Add-ons:

If you are running Windows click the menu button on the right-hand side of Thunderbird (next to the search box) and click Add-ons:

This will open the Add-ons Manager tab:

See the box in the upper right-hand corner of the tab labeled “Search all add-ons”? Enter “enigmail” into it and hit the enter key. You will get a list of available plugins:

The Enigmail plugin will likely be the first result:

Click the Install button to begin the installation process. You will see a progress indicator:

Once Enigmail has been downloaded and installed you will be asked to restart Thunderbird:

That’s it, you’re setup and ready to begin sending OpenPGP signed and encrypted e-mails. As you can guess sending actual e-mails will be the topic of the next Encrypt Everything installment.

Encrypt Everything: Using GPG on Linux

Now that I’ve explained how to use GNU Privacy Guard on OS X and Windows it’s time to cover Linux. Writing a tutorial on Linux is slightly more difficult because different distributions have different ways of doing things, which means I have to limit this tutorial’s scope. This tutorial is aimed at users running mainstream distributions based on Red Hat and Debian. I wrote this tutorial using Xubuntu 13.04 and looked up Fedora Core specific instructions. This tutorial is known to work on Xubuntu, all but entirely guaranteed to work on Ubuntu, and most likely applicable to Fedora Core. The good news is GNU Privacy Guard is in the standard installation of Debian and Fedora-based distributions meaning you don’t have to install it manually if you’re running Debian, Ubuntu, Xubuntu, Kubuntu, Fedora Core, or Red Hat. I will explain how to install Seahorse, a graphical GNU Privacy Guard front end for Gnome and Xfce.

The first thing you need to do is install Seahorse. On Debian-based systems, such as Ubuntu, you will need to open a terminal and enter the following command:

sudo apt-get install seahorse

On Red Hat-based systems, such as Fedora Core, you will need to open a terminal and enter the following command:

su -c "yum install seahorse"

Seahorse should now be installed. It may or may not be automatically added to your application menu, depending on the distribution you’re running however the application can be launched from all systems by entering the following command in a terminal:

seahorse

You will be greeted with Seahorse’s main screen:

Generating a new OpenPGP key pair is easy. First, click on the green plus button. You will be asked what type of key you want to create:

Select PGP Key and click the Continue button. You will now be presented with a dialog where you can enter the key pair information:

Although it’s not necessary I do recommend click the little triangle next to Advanced key options so you can manually enter a key pair length. By default it’s set to 2048 and I recommend you max it out to 4096 but you’re not required to. Whether you want to manually enter a key pair length or not you should fill in your identifying information. For this example I entered my name into the Full Name field and openpgptest@christopherburg.com into the Email Address field. Once you’ve entered your desired information click the Create button.

You will now be asked to enter a passphrase:

Enter a strong passphrase[1] as it will be used to encrypt your private key, which will prevent it from being used should it fall into unwanted hands. Remember, whoever possess the private key can use it to sign or encrypt data. If a malicious user was able to obtain and decrypt your private key they could impersonate you. After you’ve entered your passphrase into both fields click the OK button. Now comes the fun part, waiting for your key pair to be generated:

For some reason generating a key pair in Linux took much longer than generating a key pair in either OS X or Windows. It took my system approximately 20 minutes to generate the key pair. During this time Seahorse is waiting to collect enough random data, which will occur faster if you use other applications. After doing some research online I found several methods that are supposed to decrease the amount of time needed to collect enough random data. The most common recommendation I came across was an application called Entropy Gathering Daemon. I didn’t have time to download, install, and test it so I will leave you to experiment with it if you want.

After the key pair has been generated it will appear in your list of keys:

That’s it, you now have an OpenPGP key pair to encrypt and sign e-mails. Now you need to know how to import the public keys used by those you correspond with. Importing a key is easy. First, you need to obtain a copy of the public key you want to input. For this example I will use the public key for blog [at] christopherburg [dot] com. If you obtained a copy of the public key in text format paste it into a text file with a name that ends in .asc. Now go to the File menu and click Import:

In the Import Key dialog box select the .asc file containing the public key. For this example I named the file blog.christopherburg.com.asc:

A dialog box will present information from the key being imported:

If you want to see all the details click the little triangle next to Details. Once you’re satisfied that the details are correct click the import button. You will be returned to Seahorse’s main screen but the key won’t be listed. In order to see imported keys you need to go to the View menu and select Show any:

Now you will see all the keys Seahorse knows about:

As you can see the public key for blog [at] christopherburg [dot] com is listed but isn’t trusted. If you double-click on the key you can open a dialog box that will list the key’s details:

If you click on the Trust tab you can check the box labeled I trust signatures from ‘Christopher Burg ‘ on other keys:

Now the key will show up in your list of trusted keys. If you so desire you can sign the public key with your private key. Signing a public key is a way of alerting other people that you have verified that the person with the corresponding private key is who he says he is.

That’s how you setup OpenPGP key pairs in Seahorse. Now that we’ve covered methods to generate OpenPGP keys on OS X, Windows, and Linux we can move onto using Thunderbird and Enigmail to send encrypted and/or signed e-mails and decrypt and/or verify signatures on e-mails, which will be covered in the next tutorial.

Encrypt Everything: Installing Gpg4win for Windows

Last week I wrote a walk through explaining how to use OpenPGP to encrypt your e-mail on OS X. Today I’m going to write a walk through explaining how to install GNU Privacy Guard in Windows. GNU Privacy Guard is a collection of OpenPGP tools. GPGTools, which was covered in last week’s OS X tutorial, is actually built on GNU Privacy Guard. After installing GNU Privacy Guard in Windows you will be able to generate OpenPGP key pairs, import public OpenPGP keys, and encrypt and decrypt messages using OpenPGP. Furthermore, installing GNU Privacy Guard is needed for sending and receiving OpenPGP encrypted e-mails, which will be covered in a future tutorial.

The first thing you need to do is download Gpg4win from here. As of this writing version 2.1.1 is the latest and the version used to create this guide. Previous versions of Gpg4win may not work with this guide.

Now that you have Gpg4win downloaded it’s time to begin installing it. Installing Gpg4win is pretty straight forward. Just click the Next button five times and the Install button. After clicking the Install button you’ll get a progress bar informing you of what packages are being installed. Once everything is installed click the Next button again. Now you’ll be informed that Gpg4win needs a list of root certificates. Check the box labeled Root certificates defined or skip configuration and click the Next button again followed by the Finish button. Gpg4win is now installed.

Now you will need to generate your key pair. There are two ways you can do this. The first method is using Kleopatra, a graphical interface installed with the Gpg4win package and the second method is to use the command line tools. I will walk you through using the command line tools because Kleopatra only allows you to generate 3072 bit keys while the command line allows you to generate 4096 bit keys. Don’t worry, using the command line isn’t hard.

To create your key pair open the Command Prompt and issue the following command:

gpg --gen-key

You should get the following output:

gpg (GnuPG) 2.0.20; Copyright (C) 2013 Free Software Foundation, Inc.
This is free software: you are free to change and redistribute it.
There is NO WARRANTY, to the extent permitted by law.

Please select what kind of key you want:
(1) RSA and RSA (default)
(2) DSA and Elgamal
(3) DSA (sign only)
(4) RSA (sign only)
Your selection?

Since you will want the ability to sign and encrypt e-mails using OpenPGP select 1. Now you will be asked to enter a key length:

RSA keys may be between 1024 and 4096 bits long.
What keysize do you want? (2048)

Type 4096 and hit enter. You will now be asked to enter an expiration date:

Requested keysize is 4096 bits
Please specify how long the key should be valid.
0 = key does not expire
= key expires in n days
w = key expires in n weeks
m = key expires in n months
y = key expires in n years
Key is valid for? (0)

I tend not to set expiration dates for OpenPGP keys because issuing new keys periodically is an inconvenience for the people I e-mail regularly. When you want your key pair to expire or not is entirely up to you so enter whatever you want. If you go with the default (no expiration date) you will be asked to verify that you don’t want to key pair to expire:

Key does not expire at all
Is this correct? (y/N)

Enter y if you don’t want an expiration date and N if you’ve changed your mind. It’s now time to enter your personal information. For this example I will enter my name in the Real name field, openpgptest@christopherburg.com in the Email address field, and leave the Comment field blank:

GnuPG needs to construct a user ID to identify your key.

Real name: Christopher Burg
Email address: openpgptest@christopherburg.com
Comment:

You will not be given one more chance to change things:

You selected this USER-ID:
"Christopher Burg "

Change (N)ame, (C)omment, (E)mail or (O)kay/(Q)uit?

Selecting O will result in a dialog box appearing asking you to enter a passphrase. This passphrase will be used to encrypt your private key. Whenever you want to use your private key you’ll need to enter your passphrase first in order to decrypt it:

Enter a strong passphrase[1] and click enter, which will result in you being asked to re-enter the passphrase:

That’s it, you now have an OpenPGP key pair that can be used to sign and encrypt e-mails. I will cover sending encrypted e-mails in a future tutorial because the method I use in Windows, Thunderbird with Enigmail, is the same method I use in Linux. Therefore, to make less work for myself, I will first write a tutorial explaining how to install GNU Privacy Guard in Linux before writing a tutorial on using Thunderbird and Enigmail.


[1] For example, the passphrase “passphrase” is very poor. It’s not only short, but it’s also easily guessed and commonly found in dictionary files. The passphrase “This is a random phrase that says nothing but probably isn’t easily guessed nor commonly found in most dictionary files.” is notably better since it’s not easily guessable or a commonly used phrase (although, now that it’s publicly published to the Internet, it’s worthless so don’t use it). Mixing in numbers and special characters will improve the passphrase even more.

Edit: 2013-06-13: 22:26: Corrected the command –key-get to be –gen-key. Thanks Luca for pointing it out.

Encrypt Everything: GPGTools for OS X

Yesterday I gave a high level overview of OpenPGP. Today I want to dive into the practical portion of OpenPGP by explaining how to use GPGTools on OS X to encrypt e-mail communications. The first thing you will want to do is get the latest version of GPGTools from here (versions prior to 2013.05.20 will not work with Apple’s Mail application in 10.8). Installing GPGTools is a straight forward affair, just click Continue, Install, and Close (for this tutorial it is assume that you performed the default installation, if you customized the installation all bets are off).

After installation has completed GPG Keychain Access will automatically open and, if this is your first installing it, ask you to generate a new key pair (click to embiggen):

For the duration of this tutorial I will be using the e-mail address openpgptest@christopherburg.com (it’s a junk address, don’t both spamming it). Besides your e-mail address I would recommend changing the Length field to 4096. When it comes to encryption keys you need to go big or go home. Since openpgptest@christopherburg.com is a junk address I set the key to expire but you may want to uncheck the Key expires box if you plan to use your key pair with your e-mail address on a permanent basis (reissuing keys to everybody you e-mail can be a pain in the butt so setting them to expire can be a notable inconvenience). The only other field you need worry yourself with is the Upload key after generation check box. If checked the key will automatically be uploaded to the keys.gnupg.net key server (whether you want to do this is an entirely personal matter).

Once you’ve entered your key pair information click the Generate key button, which will result in the following dialog appearing:

Feel free to muck about with your computer for a bit to increase randomness. While the application is waiting around on randomness a dialog asking you to enter a passphrase will appear:

The entered passphrase will be used to encrypt your private key. Even if somebody manages to steal a copy of your private key file it will remain useless to them unless they also have your passphrase or can brute force it. To prevent the latter it is recommended that you enter a long, complex passphrase that won’t be easily guessed or likely found in a dictionary file (which is a table of words and common phrases used to brute force passphrases quickly).[1] Remember this passphrase because you will need it to decrypt your private key in order to use it to decrypt e-mails. After clicking the OK button you will be asked to re-enter the passphrase:

It should be pretty obvious but you need to enter the passphrase again and click the OK button. If you left the Upload key after generation checkbox checked you will see this dialog box:

Once the file is uploaded you will see your key pair added to the GPG keychain and it will be displayed in GPG Keychain Access:

You are now able to decrypt messages encrypted with your public key however you don’t have any public keys for other users. Encrypted e-mail isn’t much fun when you don’t have anybody to talk to so you’ll want to import the public keys of the people you converse with via e-mail. For this tutorial I will be adding the public key for blog [at] christopherburg [dot] com to my GPG keychain. To do this click the Import button in the GPG Keychain Access toolbar. A dialog box will appear asking you to select an .asc file to import into your GPG keychain:

.asc files are simple text files with a different extension. As I explained in yesterday’s installment of Encrypt Everything, OpenPGP public keys are blocks of text. To create an .asc file from a copied public key you simply need to past the text into a new text file and save it as a name ending in .asc. After you click the Open button you will be notified that the public key was imported:

The public key will not appear in your GPG keychain in the GPG Keychain Access application:

Now you can encrypt e-mails with the blog [at] christopherburg [dot] com public key. E-mails encrypted with that public key can only be decrypted by the holder of the corresponding private key (which, in the case of blog [at] christopherburg [dot] com, is me).

Now you are ready to communicate over e-mail securely. Let’s send an encrypted e-mail to blog [at] christopherburg [dot] com. Open up the Mail application and start a new e-mail. When composing your e-mail you will notice two buttons sitting below the subject field on the right-hand side:

Clicking the left button will encrypt the e-mail and clicking the right button will sign the e-mail. Signing your e-mail allows the recipient to verify you sent it (so long as they have your public key). I always sign my e-mails so authenticity can be ensured by the recipient. For this test we will click both buttons so the e-mail will be encrypted and signed:

You’ve probably noticed the new button in the upper right-hand corner of the form. This button allows you to select whether you want to encrypt and/or sign the e-mail using OpenPGP or S/MIME. By default it’s set to OpenPGP, which is what we want. Upon click either the encrypt or sign button the OpenPGP button will turn green. When you click the send button you will be asked to enter the passphrase for your private key:

Unless you check the Save in keychain checkbox this dialog will appear every time you send a signed e-mail (since you use the recipient’s public key to encrypt the e-mail you won’t have to enter your private key passphrase when you encrypt but don’t sign an e-mail). I recommend not checking the Save in keychain checkbox because doing so will store the passphrase for your private key in OS X’s login keychain, which means anybody who obtains your login password will be able to decrypt your private key, which will allow them to decrypt encrypted e-mails send to you.

That’s it, you’ve just sent your first OpenPGP encrypted e-mail. Any e-mails sent to your account that have been encrypted with your public key will be automatically decrypted and their contents displayed in Mail. That wasn’t too bad, was it?


[1] For example, the passphrase “passphrase” is very poor. It’s not only short, but it’s also easily guessed and commonly found in dictionary files. The passphrase “This is a random phrase that says nothing but probably isn’t easily guessed nor commonly found in most dictionary files.” is notably better since it’s not easily guessable or a commonly used phrase (although, now that it’s publicly published to the Internet, it’s worthless so don’t use it). Mixing in numbers and special characters will improve the passphrase even more.

Encrypt Everything: OpenPGP

I firmly believe that all communications should be encrypted. Even if you have nothing to hide you can contribute to the greater good by encrypting your communications. How so? Simple, encrypted communications appear as garbage data to prying eyes that lack the keys necessary to decrypt them. The more encrypted communications flying across the wires the more garbage data prying eyes have to dig through. If all communications were encrypted spies in organizations such as the National Security Agency (NSA) would entirely ineffective.

Tools that enable users to encrypt e-mails have been around for ages but, sadly, few people take advantage of them. In the hopes of alleviating this problem I am going to provide guides to help people get this stuff encrypted. For the first entry in my Encrypt Everything series I’m going to discuss a tool that will allow you to communicate securely over e-mail, OpenPGP.

OpenPGP can be briefly summarized as a software package that allows users to generate public/private key pairs that can be used to securely communicate with other OpenPGP users.

The first question most people are likely to ask is, what the heck is a public/private key pair? Don’t worry, it’s not complicated. Public/private key pairs are used for asymmetric cryptography. Asymmetric cryptography is a fancy way of noting an encryption method that uses two keys, one public and one private. Data encrypted with the private key can only be decrypted with the public key and data encrypted with the public key can only be decrypted with the private key. After generating a public/private key pair you provide your public key to those who want to communicate securely with you. In turn they will provide you with their public key. When they want to send you a secure communication they will encrypt the message with your public key. That message can only be decrypted with your private key, which, as the name implies, is held by only yourself. When you want to reply to the secure communication you encrypt your response with their public key, which can only be decrypted by their private key.

OpenPGP allows you to generate a public/private key pair, encrypt messages with either your private key or another person’s public key, and decrypt messages sent by people who have provided their public key.

An OpenPGP keys looks something like this (which is the public key to blog [at] christopherburg [dot] com):


-----BEGIN PGP PUBLIC KEY BLOCK-----
Version: GnuPG/MacGPG2 v2.0.19 (Darwin)

mQINBFGkG1IBEACa4FOajIwxUFdwC0C12c1DCg6+gmWcZBnQdfRtV6Z2d1yP9trM
AxdT0ZCSJP5MkEI1t3pvc+r79oPbyK0f4QVe1rJerOVAjEglZhdrWqDyf3Rp5rIH
Ukca7keZ+5Wf9dA+9B//LECzG4sj5qr6Kcssqb27PjK0XLq6O9963/6Lubkdomzj
R/fKjmM2WMLs/tBF0HEZp6sSEeoot+28QtXgzDIE0um2l/ccK4tTLR08NC43+uVu
dh7IJ6CX9bNoeCbmAEjOBONt0pKufvzTMsmGjMuFRc+cJnmXYeAjon9CitnUEXV9
Wmpw2K6XIKxo3PlDQcomKDV6inZySXnzXsOmomTR9XO1G4kaE9BYKdCaOdzCncPb
Au0JeTNu6eqTwrUfQZXuVdKhfRQsqrhxEAEZgpa5ojbseVNt3oOJnYXOYgl3JCku
naILz7hXMGKFQoGOojN6IpffJTjeWNiuj4KMDLTWuOKU1bX1yWJhz84U2HdhoI0L
bWiWVZDLHSjLareSJvXjtdi0v4CgvgF6b+xpIH8pfP+wqBnqZUGT96B5jRUOKuaI
MlHXHkfF070gOa4UbqJtjOHSwU9PcMUXcOxTqJen643+tAXAoqAEHLjIp2fNzmkc
6NB0T1h8JCmqHz+fv5rnKZM9lKkFO6eNPVYz2OoPb+4Zlu2pBvwsja0kBQARAQAB
tCtDaHJpc3RvcGhlciBCdXJnIDxibG9nQGNocmlzdG9waGVyYnVyZy5jb20+iQI4
BBMBAgAiBQJRpBtSAhsvBgsJCAcDAgYVCAIJCgsEFgIDAQIeAQIXgAAKCRAXquxa
uJ2eMegiEACWDIcNPQibNBNWQ5bBl/sCTxoeQvZrf0aFK4y5n1fLxqGhyZmTZdb2
IWyO5kSyEJ0Q3M3JwFIQOnl09aYT9g75omz3EAjtJCL3XKwc3DPYvKpPj/Zq9iiM
Ou4ClXXuR9mqbvu4JOCYVq2r+NZuoQ+mOvEPjp5zA5ARoJ/9r7nO3/foQZ/22PZZ
t7NMUfv+IYwlQ7vBun01gymC1u4ViBOgyl0DzlXKtUPmmPp8PB6E+I6OvnSmRLdt
tfxFzXYGLPZWva6/hGQeptvofYhv0kAvMgOmPtkCpf4RpUz4ebT2mr9vHgVH+VYc
BNFYJLXPdJmbqqD9KdesQ48YvAi50G/MaP8xxVaYI5YD004HO7h2lp9WX0CMWN/l
jRW1yHP/AW+5aw06/LohcDdG/HQjYYkzjX6qUSYg/U/Tky7hmDile9WkMUP22eOk
AkV7OBKly4c3uxqR5+fH5N9GcSbSk6avkbPU8w27t3E6m0PnKRkpUrn/2OFd7u7h
TuQGvfy3LqsVliTruHCOfIY5pmi3qcGeKkaXu7LCnNbNg86VEYYYTEHyoMw1cC99
9IMXKuvGtKaJ7mjj03n0e+7VpcRd646gw3KuQNRd0GTV2xOAJ/vEgoA30Of7Gxoa
PXRuyo67WATgU36kl9yVS5EfT3m1mMUihI5zeN1R1EJn6/tlMnyY/okCHAQTAQIA
BgUCUaQbnwAKCRADj+sE5VF3XY+TD/9jt3hgGyjFKjhRza9KTRJwBV6gFFcQU3MT
8j5evFtbMjZ1oNc5oongwJ7OtLHFVmst4cQMmupems1X7z8mj5we6MQd24CFChKf
xfJj5YwunIWXIpfilY1QznvZ1YlqNkSaQAFRFjdVY2ip4UxnRY4vf4LGT8+WO33j
gG9CXJ8VLjFs+vbXFtvsCabfJk2aNWgbaKMXzrlzlyaQokb7/tXVECNtpdBn454L
FkNMNK19pzgJcNyQMFl6ApxQJzXu8+vPTdZQCvPrEZOL28cNYU35IL3yZoz+CHR5
j123kJVdXOUyA3Z27S4qmJOC6RR9iAx+Us/W/LT03tyMrKyLZaPT90ZhCG9UDnIg
DDlXoLfPYEaVmXU5MfitwsWgtv/gSHNWTIIvc/5JB6U7XEReZw66oyngQdZSP/s3
uV670Yvvl3PaH7UvMRFmfeazqUG/+r+PFxfoMzfOFSixi+uwbT7nbBa7Iyw3F9A0
5HDP9+28PqJvfUTdGgISbvvPAB50rC2FRFhBtvoMYMROaGn87ANH96caKn8a4ynW
nJqwzCGj2l006BciJlWgvZ0jg4ndW2TJU/neuOHEoPkgdLmqaC6QeQNcWryIgX75
q0iZeqjvzWh8rhaQfPNGUS0yF2JxFU14muvvC55Ar0SKnF005Zs8Za8p9PKRfuTr
DQfVVQiAELkCDQRRpBtSARAA1W5yOTe3JxOLwjBBZeUPJjWn20HPk979593iiq6N
6GBqXNHtI8Vboeyq27qAjZoY9FXnibrIXaIJ40mcNj6yXc7n5tImpLByLPy8Ztyx
Jcpu+wC404Av879e8E8gqhbDhpQpMXHNtiuQHMwbN9kr/ohH0GgaKyJhRoJY4Rap
++CeO42v2nRYtAk9RhXehOCbXRF3szU1vdfqrL5LclqZ8rwksIqAjO6imFtvplwt
xcSXvP0slFtpEHVnY5KwUzMbgGsNuz6Fs1biyRzg9qePd2bDmZ7+/cMvasUvP2Qq
vUlxf9lyzx65i123ax4EgWDM14jWhiy+wLc+jjtXtmQ/EcDaNykoir9Gz+WPSYsp
NO6YZg4vDhGT/Afxd4Q5LNoRZ/lGfjXhmgQOgriMaKOTPAe2SgB8Qc0eYDUWO2qu
/bI3orUbeEsIMCZU3mNOhCNOhm/vhyAcdpXtnfMqQeKx4TkgZZO+lotzJa6KHhay
vCGxkZxzR3o8LP72wUke0apZprEoDymU5HSAoHv3o4aFV0AVBdjVCxcsMeCS0fJ3
aLZP9WZ0DrRktrLO8sjAsFutodInD99Ki+pYCjdS5/jixN6+R9EJ4Ud44PT84PtH
qwRVyzF+bC8Mc/QEY4PNl/698liscEe53WqPBelfR6UdvVEvKxI4jibqHwVjc6K8
e38AEQEAAYkEPgQYAQIACQUCUaQbUgIbLgIpCRAXquxauJ2eMcFdIAQZAQIABgUC
UaQbUgAKCRBAXiyJxWbQ4Zk7D/90MW3mf4tCP4yhBqc01FnZEqJuaeBQxBbK6qDw
fMPDYA1D0LRFfLoAxs40lExQQjAtwcxvuF59K0S1XoVQSPq1NyAcGyTUGwu/P7Lz
VCYsDOcBZgwFRzMZFIhSvEpBSTgnX+uKREXecoaI+MzfZbSCChnPYULIKMK3ONqD
pAfGxNIkHOYcIC93f7hB8ZFnszuyfRasgW7xyv26J4w9W0xPIRwH6dNFDpBXvQcx
JMl5jVb55u6tATGhNy7rXWAqgm5w70UNyUJFAmHfSJftfZKHAhvPmRWamnuZ22rH
cVoj9HeJgxO48BGt0tmRPu0XpCk6oSWzKU+STlSutw4DbpgCLwy+Y6Ll24ik2r+f
YpNp1t2jh/SkypLUK9YVxNGCJXtxom/awqND5QMxsziukqSptd2ltrTP4/jCdShU
FN1Srov/29ZXrM/VA7Jqf3HFOB31cHr1J+ftsqtdHsDFerw8emd9VJKSO0dHGh9f
wsZtBAz7MPS1q4qwVn8lYgrVkoohbhiSft6tHircvSX8pX78kTjUNXBkojx4FL3L
SKg9FoSYuC1nqaUobOyuy28hW5sA2FEoWVf/qb5g6lJSJ+u7zhJmis5b8aeuZ6qS
lE3KtCH35bhj63oRlCEgQUjaqTGFoueIbRrdy+wFbh7zqQuKIgQpwDo0SbvJbjfN
FEsXMemqD/947IjTloC0nFDjWJssLhNBaR1GIl0cQYktfrscCB8y+17jc7fymK3/
rnHYvjC1WpdLRHY4H30yyMutPawgnzjdViJW21sLmf/3HSDDP+0qvYRaq356FkpY
7SWj1wvS93B7UCs4A6VRvFnp5sHGPmIgSo5mqG4E36zrcnKQapPOdDfJ41Aj9l3i
f0I1Q0w+PVe6EZBHtYEOyNrT2OqAR9mq/hbM6HeZM+UilG1g6TLk11JJyKfA1V9Q
guzcjzockfePY+NQe7dy+Zc9l5TBIMBECX5YRa9A8OhZ5+q4SNMqM6itq7z1F66k
NWoFGkI+kx2e75tO7o8b5izueJbD7VPNUeE7T+WCSB8Pf4wBfuwuVbu69QpXH0XQ
WihGSJTHETqA1EoBRN6G6WKsq0affN3nO8GeSubwd3Ip/TPH4tfglxHAxegMqvLE
YLX96XueqzeCxyZroH9xqsFmUhszZz3BtuCO8h705Cv2DNprSZJah3+OTLwgMuLZ
GM2ogcvLzPTjZgib5h5j5Pp9tjBYrYnOE4/tctvQ26X2ipedV4/O1gBNTMY6ba+1
2HuLrhgrtbL698KhQahlSfTq9a0GO/GLHM+wtlrVlslSjnZt0eldQf4M+UFIEOxh
w38h55tSuK1XbKSuTpmTE5MIjebksHy6ynAco4ZQo7MLWciGcFbTQQ==
=3COR
-----END PGP PUBLIC KEY BLOCK-----

OpenPGP users can use that gobbledygook to encrypt messages that can only be decrypted by me. Generally people also post their public keys to key servers such as the one provided by the Massachusettes Institute of Technology (MIT) or Canonical, the creators of Ubuntu Linux. If you go to either of those key servers and enter my e-mail address into the search box you will be provided with my published public key.

Many OpenPGP applications can be configured to automatically check key servers for public keys. Later in this series, when I cover specific implementations of OpenPGP, I will explain who an e-mail client can automatically search OpenPGP key servers for public keys associated with e-mail addresses that have send OpenPGP encrypted e-mails. Suffice it to say publishing your public key to a key server makes life easier for other OpenPGP users but there is no requirement to do so (OpenPGP is a decentralized system).

OpenPGP public keys can also be signed by other OpenPGP users. When you sign a public key you are verifying that the person who holds the corresponding private key is who he claims to be. This establishes, what is referred to as, a web of trust. What is a web of trust? A web of trust is a decentralized alternative to the chain of trust system most of us use every day.

When you access this site through its secure connection you receive a public key that has been signed by StartCom. StartCom is a certificate authority, which is an organization that signs Secure Socket Layer (SSL) certificates (certificates used to provide secure connections to websites). StartCom’s public signing key is included in most major web browsers and operating systems so whenever you access a site secured by a certificate signed by StartCom your browser will trust it. By signing the certificate StartCom is verifying that your website is who it claims to be (in my case, blog.christopherburg.com). This system is highly centralized since it relies on a handful of certificate authorities.

Returning to the original question, what is a web of trust, the answer is that a web of trust is a system where individuals sign public keys instead of centralized authorities. If I sign your public key anybody who trusts my public key will see that I trust your public key. A person who trusts my judgement of character will then be more inclined to trust that your public key corresponds to a private key in your possession. This system becomes more effective as more people sign your public key, which is why key signing parties exist (yes, us geeks know how to party). When somebody sees your public key has been signed by several people they personally trust they can be reasonably sure that it is your key.

Now you have a general overview of OpenPGP. In the next installment of my Encrypt Everything series I am going to explain how to use GPGTools to encrypt your e-mails with OpenPGP on OS X (Why am I starting with OS X? Because that’s the operating system I generally use for e-mail. Don’t worry, I will cover other tools as the series progresses).