XD vs. Glock: Detail Strip

In the continuation of reporting my findings in my grand experiment I’m going to talk about detail stripping the guns. I posted my findings on detail stripping my XD a bit back so I don’t have to reiterate much there. I also did the latest episode of Truth About Guns which covered my findings throughout the entire experiment so go have a listen.

Anyways click the first link to learn what it takes to detail strip an XD. Go ahead and read it, the post will be here when you’re done. Seriously this post isn’t going anywhere. Done reading it? OK good. Let’s talk about detail stripping the Glock 30SF. To do this you’ll need the following tools:

1 x 3/32″ punch

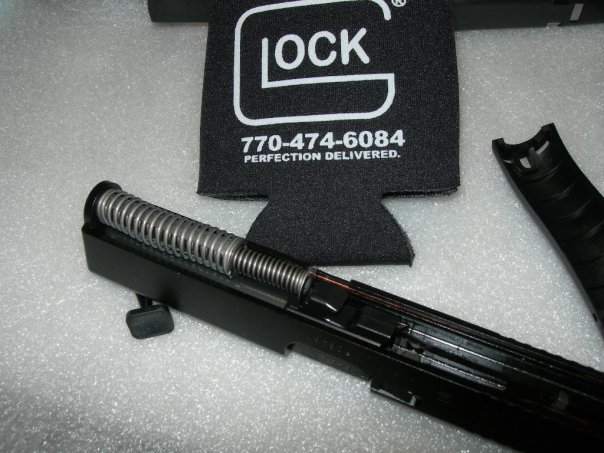
Got that? First the slide. Once you remove the slide from the frame you need to remove the recoil spring and the barrel just as you would when detail stripping an XD. From here the steps differ greatly. On the Glock you’ll need to remove the rear slide plate. There are two things you’ll need to do here. First look at the part of the striker protruding through the cutout on the bottom of the slide. In front of it (against directions are given as if you’re holding and aiming the gun) there is a small plastic sleeve. Use the punch to push the sleeve forward. While holding pressure on the slide use your thumb to slide the rear plat off. Make sure to keep your thumb over the exposed holes because things with springs will try to pop out.

Once the plat is off remove the striker assembly and the other spring which I’m at a loss of it’s correct name as I type this. The striker assembly can be further taken down by pushing the spring back which will cause to plastic cups to fall off. To remove the extractor turn the slide upside down, ensure the second spring mentioned is removed, and push down on the firing pin safety, the extractor should fall out. There you go you’ve taken the slide down now for the frame.

The frame has three pins, a trigger pin, locking block pin, and the frame pin. Use the punch to push out all three. Once removed the slide lock lever will come right out. Remove the locking block from the frame (you may need to use the punch to wiggle it out a bit). Now you can remove the trigger which is attached to the trigger bar. Use the ejector to pull out the assembly at the back of the gun. To remove the trigger bar turn it outwards from the sear assembly and life it up a bit. Unhook it from the spring. That’s it.

Putting the Glock back together is the same steps in reverse. The only note I need to make is when inserting the slide lock lever. Once the trigger and locking block are in the gun place the locking block pin in first. Than put in the slide lock lever. The spring on the slide lock lever pushes on the locking block pin and uses that for tension. After that place the other two pins in, assembly the slide, and put the two components back together. You’re done.

Seriously it’s so much easier than the XD to field strip it’s scary. This step certainly goes to the Glock.

Up Next on California’s Ban List, Gun Safes

Apparently an 11 year old child decided playing inside a gun safe was a good idea. He got locked in there.

Furthermore the employees apparently didn’t remember how to open it so they called the fire department. The employees eventually got it open without the need to blow anything up. And of course this happened in California so look for gun safes becoming illegal there or warning labels required on the front warning about the possibility of getting locked in.

Glock Generation Four Pictures, The Actual Gun

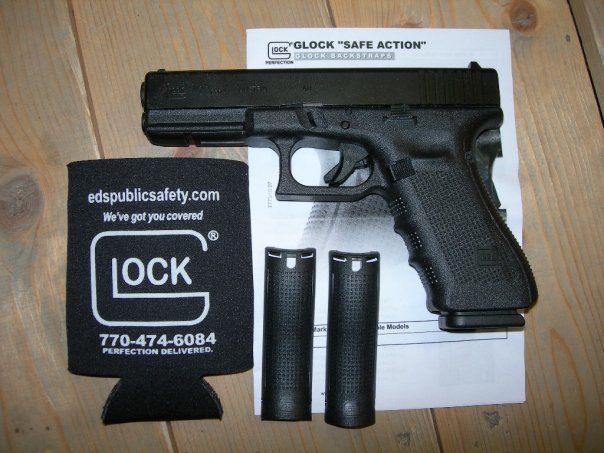
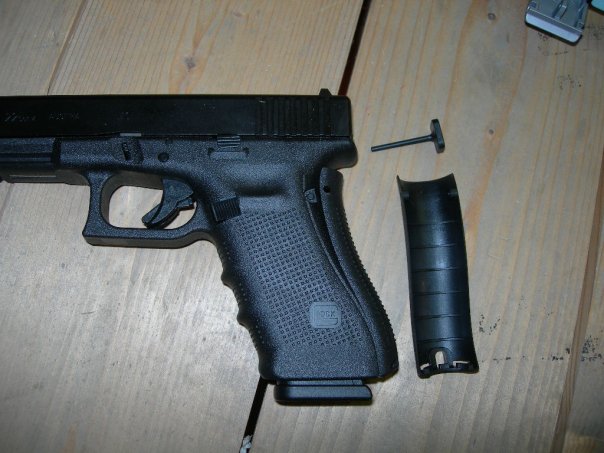
I can’t take credit for these sadly, I’m not Mr. Exclusive. But MrVvrroomm over on the MNGunTalk forums posted some pictures of what appear to be an actual Glock 22 Generation Four pistol. Here are the pictures:

If this is some Photoshop trickery it’s bloody good. Anyways we can see the removable back strap, new grip texture, new magazine release, and new recoil spring.

Glock Lawsuit

I found this one in a Glocktalk thread last night but didn’t get to posting it. Some guy ran into trouble with his Glock 36. He sent it into Glock, they replaced a part and it was sent back. The problem continued. He sent it in again and after six months they returned it saying the gun was within specs. In the end he had to take them to small claims court where he did end up winning.

That’s a pretty pathetic way to handle your customers Glock. Just saying.

It’s Official Everybody is Making a 1911

For a 100 year old design the 1911 sure is popular. But it should be because it’s an amazing weapon platform. These days everybody is making one and now we learn from The Firearm Blog that Magnum Research is going to release one next year.

It appears as though Magnum Research isn’t producing them in .50 AE sadly. Yeah sorry I’m not more excited about this but a new 1911 coming out has become the news of the month kind of thing and I just expect it now.

Glock Generation 4 Pricing

No this blog hasn’t become the all Glock all the time blog. But they are popular and they are brining out something somewhat new (kind of?). Anyways The Firearm Blog has obtained pricing information on the next generation of “perfection” (that just happens to need improving every few years). They found dealers, MSRP, and law enforcement prices. It doesn’t look like the prices between current Glocks and the next generation ones is all that different.

Springfield XD Detail Strip

Since the carry holster for my Springfield XD is down for repairs I decided it would be a great time to completely disassemble the gun and give it a thorough cleaning. In doing this I learned a very valuable lesson, reassembling the Springfield XD sucks.

I striped the gun completely to the frame. Every component was removed. It’s amazing how much crud gets missed in a basic field strip and cleaning. Anyways due to the frustrations I encountered I’m going to make some notes in regards to detail stripping and reassembling the Springfield XD.

First thing to note is removing the striker. Getting the cocked indicator out is simple enough, you press in the indicator guide and slide off the rear plate. When you get the plate off out comes a spring and the indicator, but not the striker. If you look at the top of the gun you’ll notice a roll pin, this is holding the striker in. You have to take a punch and hammer to gently tap it out from bottom to top (the bottom hole is smaller than the top one by a slight bit). I hate roll pins. Unless you have a special roll pin punch it’s far too easy to damage a roll pin during removal and more likely reassembly. I personally do not like this design choice at all.

That’s not too big of a deal though since I’ve had the striker out before. What sucked was the frame itself. Pulling apart an XD is a simple ordeal. Remove the take down lever (it wiggles out) and the two pins above the trigger. That removes the locking block and trigger assembly. That’s the easy part.

Removing the sear involves another pin located in the rear rails on the frame. Tap it out and the sear and accompanying equipment come out. The ejector is held in by another blind pin which you can see in the left rear rail (all directions are assuming your looking at the gun as if you were aiming it). This pin serves two functions, holding the ejector into place and keeping tension on the spring that probably flew out when you removed the previously mentioned pin. You can remove the blind pin by inserting a flat head screwdriver on the right end of the pin and pushing it out.

But now comes the fun part, the grip safety. Removal is simple, punch out the pin on the gun’s grip. Off pops the grip safety and it’s spring. Take out the magazine catch, which is another pin, and you’ve completely striped the gun, simple.

Most guns the instructions for reassembly are to just reverse the instructions for disassemble it, not quite so with the XD. So if you’ve detail stripped your XD’s frame here are some tips I have for you to reassemble the gun.

The first thing you should do is reinsert the ejector, sear assembly, and accompanying pins. If you start with the grip safety you’ll find yourself pulling it out later to redo it. Assembly of the aft-mentioned parts is mostly doing what you do to remove them in reverse. But only thing to not is when you reinsert the sear spring you need to hook one of the arms under the ejector’s blind pin. This can be a bit of a pain but I found using a Phillips screwdriver and getting the arm into one of the slots makes this job fairly easy. Just press the arm down, move the pin over it, and you’re done.

Here comes the hard part, the grip safety. Fuck this part. When you removed the grip safety you probably noticed the spring isn’t symmetrical. There are two arms coming off of the spring, one much longer than the other with a bend at the top. When inserting the spring that arm should be on the right side of the grip safety. If you look carefully at the spring you’ll notice the hole the pin is supposed to travel through it’s a perfect hold. The short arm crosses over the hole, this is going to cause some pain.

To reassemble the grip safety you need to insert the spring into the safety lever and than gently insert the lever into the rear of the gun. Do not even the slightest bump agains the spring will make it pop out and you’ll get to start all over. What I did was held a flathead screwdriver against the bottom of the spring on the front of the lever to hold the spring in. This will allow you to get the spring in far enough to insert a very small screwdriver (think of one you’d use to tighten the screws on a pair of glasses) through the grip safety pin hole on the frame and into the pin hold on the lever and spring. Not insert this tiny screwdriver through the left side since you’ll need to drive the pin through the right side.

Look at the grip safety pin. You’ll notice a little notch slightly left of center. This notch is important. You need to slide the pin in from right to left with the side the notch is closer to being inserted first. Remember the spring arm crosses the pin hold? Well that arm fits into the pin’s notch. While still holding the spring in with the tiny screw driver drive the ping in far enough to hold the spring. Now you will need to use that screw driver to pry the small spring piece that crosses the pin hold out so the pin can pass through. Once you get the pin through you should just press down on it until you feel the arm click into the notch. If the arm isn’t perfectly nestled into that notch the grip safety will press in but won’t pop back out again. You may have to move the pin back and forth slightly until it all fits together.

Reassembly of the rest of the gun is just a reverse of the disassembly. It took me a good hour to get that grip safety back in there properly (partially because I put it in before the sear assembly and had to take it out again). It’s a pain in the ass. I realize my description is hard to follow and pictures would be better but I didn’t have the foresight to take pictures and I sure as the Hell am not taking that thing apart again unless is breaks.

As I’ve been comparing the XD and Glock I can say this really put me off the XD path. It’s such a stupid design. More thought should have been given to reassembly here. I’m going to detail strip my Glock and than I will actually compare the two operations but I can’t imagine the Glock being even 1/10th as hard as the XD to reassemble.

If you’re going to detail strip the XD I highly recommend obtaining a copy of AIG’s Springfield Armory XD Pistols Armorer’s Course video. It covers the reassembly of the gun in good detail and you’ll want that detail less you do it wrong (like inserting the grip safety pin in backwards).
Glock Generation Four News

It appears some more information is bring released about the next generation of Glock pistols. Says Uncle has a possible picture of the new pistol while The Firearm Blog has found mention of new Glock 17 and 22 models being mentioned on a firearm distributor site.

There is talk that the new model of Glocks will have a redesigned recoil spring but that isn’t apparent in the previously mentioned picture. What the picture does show is the new Glock will have swappable back straps, a more aggressive but not as aggressive as RTF2 frame, and what appears to be a larger magazine release (hopefully ambidextrous).

I still don’t understand how Glock would improve their pistols which they claim are prefect. But I do love the fact they are moving to swappable back straps. Why? Because when I mention swappable back straps on the XD(M) pistols a Glock fan boy usually crows about how that is just another unneeded part that will break. I’m guessing it’s not going to be a great new innovation from Glock. Fucking fan boys.

Why It’s Smart to Have a Spare Carry Rig

This post is two fold, first an explanation why you should have a complete backup carry rig and second to compliment a company.

Earlier this week I noticed a small crack on the Kydex of my carry holster. The crack appeared where the Kydex curves down from the part that covers the top of the slide and meets the rivets which fasten the Kydex to the leather. Well anyways the holster is a Crossbreed SuperTuck which has a lifetime warranty. I decided to test it out and on Saturday I shot them off an e-mail. They responded, on a frickin Sunday. Anyways I just have to ship it off to them and they’ll take care of it. Sweet deal.

Oh and of course I’m required to give my FTC disclaimer when talking about products. Dear FTC please send me your mailing address so I can ship you a retractable baton. You know the rest.

Anyways the also brought up the fact I’m glad I bought a carry holster for my Glock 30SF. A lot of people have a spare carry gun but many of those people don’t have a spare carry holster. The idea is the gun will fail at some point but most people don’t stop to think that the holster may also fail. If you carry a gun you should have a complete backup carry rig. Sure you can buy to of the same gun and two of the same holster, but you should have backups to everything you need when carrying. You never know what is going to break nor when.