The State Fails to Stop the Signal

Earlier this year the United States government attempt to suppress Computer-Aided Design (CAD) models for 3D printable firearms from being distributed by placing them under the control of the International Traffic in Arms Regulations (ITAR). By bringing ITAR into the equation the state was able to label those CAD models as munitions and prevent them from being legally exported from the country. Since those CAD models are under ITAR regulations I’m completely baffled by this story:

Less than two months after the debut of the first almost entirely 3D-printed handgun, a Canadian gunsmith has created the first 3D printed rifle.

The gun maker, who goes by the online handle CanadianGunNut, is an active user on DEFCAD, the primary online forum for 3D-printed firearms.

Doesn’t he know that the idea for 3D printable firearms originated in the United States and it is therefore illegal to export that idea, now that it has been labeled a munition, to his native country of Canada?

Information control, like gun control, is a foolhardy dream that can never be realized. Throughout our history handfuls of individuals have attempted to suppress information they believed to be harmful but failed as other individuals discovered more effective ways to disseminate information. 3D printable firearms are in their infancy but this will change as 3D printer technology improves and becomes more widely available to the masses. Eventually we will be able to print off firearms that are every bit as good as, or better than, currently manufactured firearms. Now that the state is in a position where it has to stifle both information and physical firearms its goal is completely unattainable.

The Feds Want Everything

The federal government sure is a grabby little bastard. First it taps all of our phones and Internet connections and now it’s demanding passwords and Secure Sockets Layer (SSL) certificates. Let’s start with their demands that online service providers hand over their customers’ passwords:

The U.S. government has demanded that major Internet companies divulge users’ stored passwords, according to two industry sources familiar with these orders, which represent an escalation in surveillance techniques that has not previously been disclosed.

If the government is able to determine a person’s password, which is typically stored in encrypted form, the credential could be used to log in to an account to peruse confidential correspondence or even impersonate the user. Obtaining it also would aid in deciphering encrypted devices in situations where passwords are reused.

“I’ve certainly seen them ask for passwords,” said one Internet industry source who spoke on condition of anonymity. “We push back.”

A second person who has worked at a large Silicon Valley company confirmed that it received legal requests from the federal government for stored passwords. Companies “really heavily scrutinize” these requests, the person said. “There’s a lot of ‘over my dead body.'”

Some of the government orders demand not only a user’s password but also the encryption algorithm and the so-called salt, according to a person familiar with the requests. A salt is a random string of letters or numbers used to make it more difficult to reverse the encryption process and determine the original password. Other orders demand the secret question codes often associated with user accounts.

The difficulty of handing over user passwords is that any system administrator worth his salt (pun intended, deal with it) only stores a hash of the password. For those of you who don’t know, a hash is the result of a one-way algorithm. You put some text in and the hashing algorithm gives you some output. Ideally, the input cannot be recovered from the output and the algorithm gives a different output for each unique input. Salts are often added to the hashing algorithm to trip up word list attacks, as the added information to the input creates a different output than sending the clear text password alone.

Assuming the system administrator or software developer properly implemented this system (which is difficult to do), receiving the password hashes would do the federal government very little good. They may be able to reverse individual passwords given enough time and computing power but it’s almost certainly outside their capabilities to revere every user’s password. I would be less concerned about the federal government receiving and reversing my password than I would be of it performing rubber-hose cryptanalysis on it.

The other thing the federal government has apparently been demanding from only service providers are their SSL private keys:

The U.S. government has attempted to obtain the master encryption keys that Internet companies use to shield millions of users’ private Web communications from eavesdropping.

These demands for master encryption keys, which have not been disclosed previously, represent a technological escalation in the clandestine methods that the FBI and the National Security Agency employ when conducting electronic surveillance against Internet users.

If the government obtains a company’s master encryption key, agents could decrypt the contents of communications intercepted through a wiretap or by invoking the potent surveillance authorities of the Foreign Intelligence Surveillance Act. Web encryption — which often appears in a browser with a HTTPS lock icon when enabled — uses a technique called SSL, or Secure Sockets Layer.

“The government is definitely demanding SSL keys from providers,” said one person who has responded to government attempts to obtain encryption keys. The source spoke with CNET on condition of anonymity.

Having a service provider’s SSL private keys would allow a malicious individual to intercept and decrypt any SSL secured traffic going to or coming from a service provider’s network. This concern can be put to rest if service providers began implementing forward secrecy (which I enabled on this site beginning last month). Forward secrecy negotiates temporary session keys for SSL connections. The temporary keys are used to encrypt and decrypt data going between a service provider and a customer. After the session concludes the keys, at least ideally, are to be disposed of. Implementing forward secrecy means that an attacker is unable to decrypt SSL secured traffic even if they are in possession of the correct private key. Unfortunately, as a recent study by Netcraft noted, very few service providers currently implement forward security (leading one to wonder why a guy operating a free blog is able to implement security technologies before multi-billion dollar corporations). It would be wise, especially in light of recent developments, to put pressure on service providers to implement forward secrecy.

While it’s annoying that the federal government has become a surveillance state, there are technologies that allow us to mitigate many of their demands. We live in a world where the spying powers of the state are incredible but the power to avoid surveillance is also very powerful. The state is a collection of a handful of individuals fighting the rest of the world. With such high odds against it, the state will be unable to win in the long run.

Nothing Changes Through Politics

A lot of anger was created when Edward Snowden revealed that the National Security Agency (NSA) was actively spying on every American. If one believed in the political system they would likely be lead to believe that a majority of senators would move to shutdown the NSA’s Stasi-esque activities. Once again those individuals have been proven wrong:

In a 205-217 vote, lawmakers rejected an effort to restrict the National Security Agency’s (NSA) ability to collect electronic information.

What should be taken away from this vote is that no meaningful change can be achieved through the political system. The United States like to sell itself as the land of the free and the home of the brave, but there is nothing less free than widespread surveillance and nothing more cowardly than hiding behind a bully, in this case the state, in the hopes he will beat up anybody who may pose a threat to you. This vote merely reinforced the fact that the United States is the land of the subservient and home of the fearful.

Fortunately, there are other options. Instead of relying on a bunch of politicians to grant you freedom from Big Brother you can make use of currently available technologies to make yourself free immediately.

Everything Old is New Again

Edward Snowden’s leak that made the public aware of the fact that the National Security Agency (NSA) was spying on everybody ended up being the straw that broke the camel’s back for many. Those people finally realized that the United States isn’t the freest country on Earth and that our government isn’t any better than the communist regimes they were told to fear throughout the entire Cold War. Of course, many of those people also believe that the state’s act of rampant spying is new and that, historically, such things were unthinkable. As it turns out, a snoopy federal government is nothing new in the United States:

In 1862, after President Abraham Lincoln appointed him secretary of war, Edwin M. Stanton penned a letter to the president requesting sweeping powers, which would include total control of the telegraph lines. By rerouting those lines through his office, Stanton would keep tabs on vast amounts of communication, journalistic, governmental and personal. On the back of Stanton’s letter Lincoln scribbled his approval: “The Secretary of War has my authority to exercise his discretion in the matter within mentioned.”

[…]

Having the telegraph lines running through Stanton’s office made his department the nexus of war information; Lincoln visited regularly to get the latest on the war. Stanton collected news from generals, telegraph operators and reporters. He had a journalist’s love of breaking the story and an autocrat’s obsession with information control. He used his power over the telegraphs to influence what journalists did or didn’t publish. In 1862, the House Judiciary Committee took up the question of “telegraphic censorship” and called for restraint on the part of the administration’s censors.

History repeats itself. Today’s states are advantaged by technologies that makes snooping easier than ever. But states have always utilized the most advanced technologies of their time to keep tabs on what the people were up to. Fortunately, technology is a double-edged sword. While it enables states to spy on people it also allows people to fly under the radar of Big Brother. In Lincoln’s time one could prevent Stanton’s office from knowing what was being transmitted on telegraphs by encoding their messages. We have the same capability today. Modern cryptography allows us to keep prying eyes from reading our communications, so long as we use the tools available to us correctly (which isn’t always easy).

Since humanity continues to repeat old mistakes it makes sense to get into the habit of expecting those mistakes and developing plans to mitigate the consequences. The states of today, just like the states of yesterday, are allowed to snoop on the people because the people continue to make the mistake of entrusting monopoly powers to handfuls of individuals. That being the case, one should always assume that those holding power are watching. Making such assumptions the default helps get us into the mindset necessary to develop and utilize techniques to slip by the watchmen. If enough people get into such a mindset it could, finally, give rise to a society where the watchmen are rendered mostly harmless.

Encrypt Everything: Sending OpenPGP Encrypted E-Mails with Thunderbird and Enigmail

Finally, it’s here, the final guide in my OpenPGP series. I’m sorry it took so long to post but free time has been at a premium as of late. This guide will explain how to use Thunderbird and Enigmail, which you should already have installed, to send e-mails that will give the National Security Agency (NSA) a hard time.

Before I get to the guide I want to note a couple of things. First, this guide will not explain how to add your e-mail account to Thunderbird. If you need instructions on that please see Mozilla’s guide for automatic account configuration and manual account configuration. Second, this guide will be applicable to OS X, Windows, and Linux but the screenshots will be taken from OS X as that is the primary operating system I use. With those notes out of the way let’s begin.

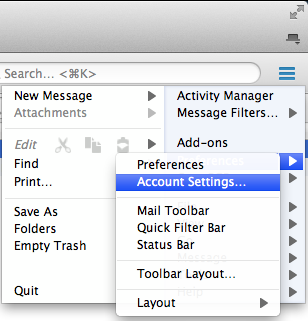
The first thing we need to do is enable OpenPGP for your account. This can be found by navigating to the menu button, selecting Preferences, and clicking on Account Settings…:

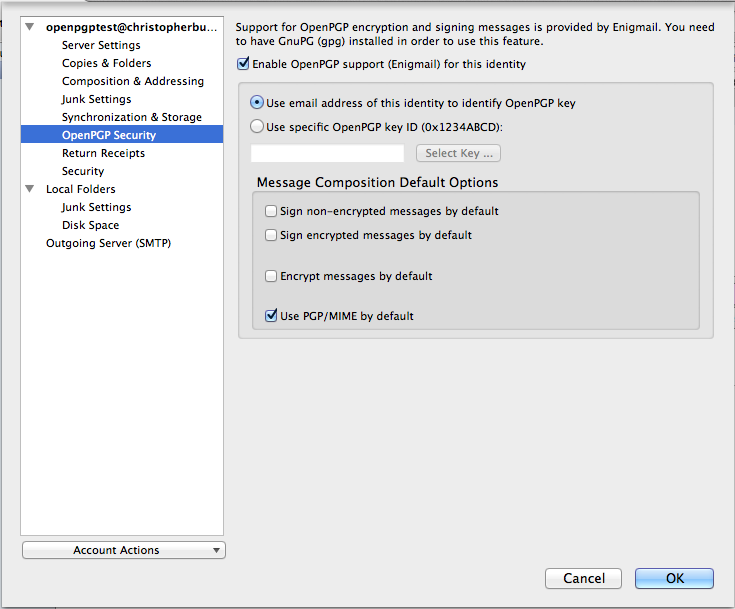
You should be looking at the Account Settings… page. From here select the OpenPGP Security item under your e-mail account:

By default OpenPGP is disabled for every account. To enable OpenPGP for your account click the Enable OpenPGP support (Enigmail) for this identity check box. This will also allow you to change the options below the check box. By default Enigmail is setup to use your e-mail address to identify the OpenPGP keypair to use for your account. If you entered your e-mail address when you created your OpenPGP keypair this is the option you should selection, otherwise you’ll have to manually select a keypair.

You will also notice several check boxes under Message Composition Default Options. The check box labeled Sign non-encrypted messages by default will ensure that Enigmail cryptographically signs e-mails that you’re not encrypting. I usually select this because the cryptographic signature allows recipients of my e-mails to verify that I sent the e-mail and that the contents haven’t been altered. The check box labeled Sign encrypted messages by default does the same thing as the check box above it but for encrypted e-mails. I usually check this by default as well. Selecting Encrypt messages by default will cause Enigmail to encrypt every e-mail you send. I usually leave this option unchecked because most of the people I send e-mails to don’t have OpenPGP and therefore are unable to decrypt messages I send to them.

The last check box, which is labeled Use PGP/MIME by default, is, in my opinion, pretty useful. Normally when you send a cryptographically signed and/or encrypted message the recipient sees a blob of text. PGP/MIME puts OpenPGP signatures and encrypted content into attachments. If the recipient is using OpenPGP, and has the proper decryption key, they will see whether or not the signature is valid and be able to read the encrypted contents. On the other hand, if the recipient isn’t using OpenPGP, they will not see the signature text or the encrypted content. I check this option because the signature text and encrypted content often confuse recipients unfamiliar with OpenPGP. When this option selected, as far as the recipients without OpenPGP are concerned, the e-mail is just a regular old e-mail.

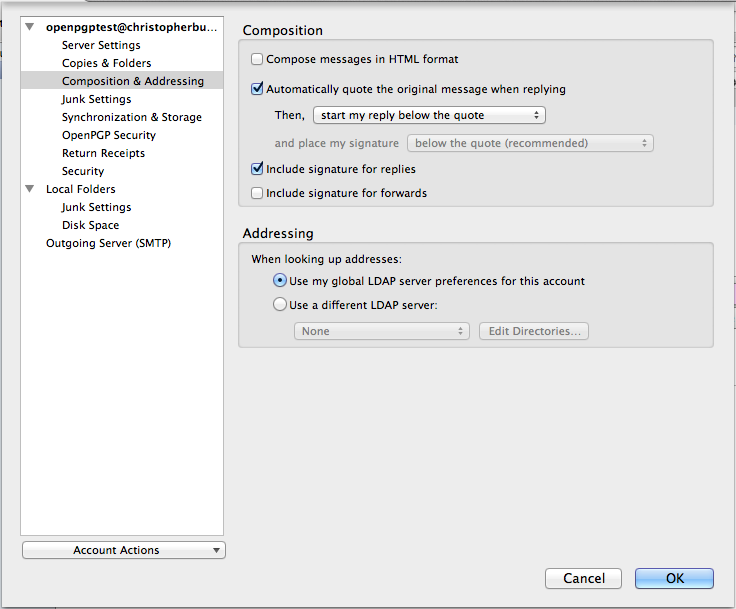
Before leaving the Account Settings… page there is one other thing you may wish to consider doing. Navigate to Composition & Addressing:

By default Thunderbird is setup to use HyperText Markup Language (HTML) formatting for e-mails. I’m not a fan of HTML formatting when it comes to e-mails and it can raise some Cain with the OpenPGP signature process. I always deselect Compose messages in HTML format. You can either leave it checked or not, it’s up to you.

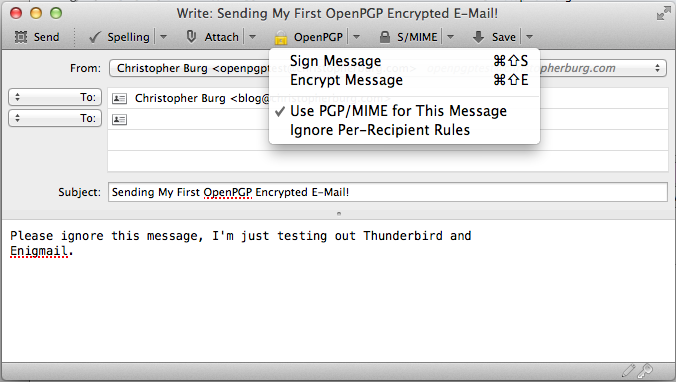
Once you’ve completed your work in the Account Settings… page click the OK button; it’s time to send an e-mail. Composing an encrypted and signed e-mail with Thunderbird and Enigmail is easy. Start a new e-mail and enter the recipient, subject, and message you want to send. After you’ve done that click the arrow next to the OpenPGP button in the toolbar:

As you can see, encrypting the e-mail, if you didn’t setup Enigmail to do it automatically in the Account Settings… page, is as simple is clicking the Encrypt Message menu item. If you look at the lower right-hand corner of the e-mail composition window you’ll see a key. If the key is gray the e-mail will not be encrypted, if the key is yellow the message will be encrypted.

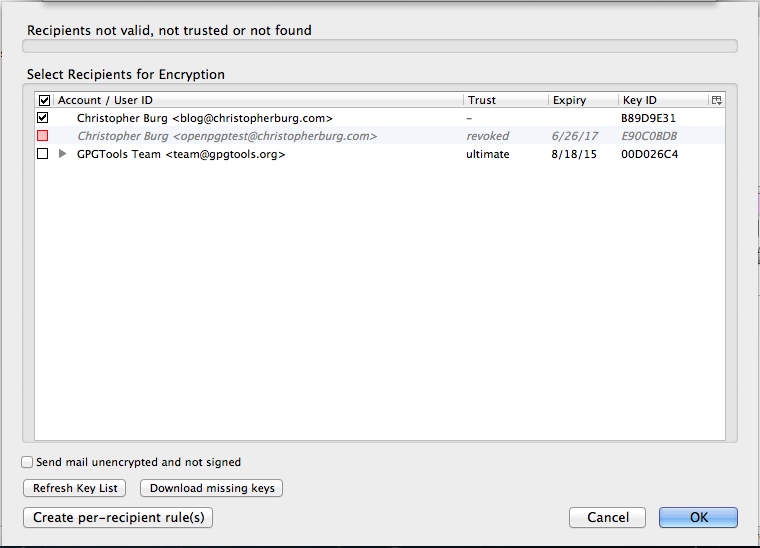
Now that your e-mail is setup to be encrypted it’s time to click the Send button. If you haven’t imported the recipients public key into GNU Privacy Guard or flagged the recipient’s public key as trusted you will see the following dialog:

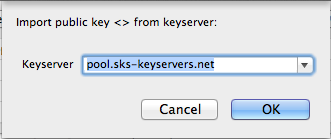
If you’ve imported the key but never flagged it as trusted just click the check box next to the recipient’s public key. You can also attempt to download the recipient’s public key from a key server if you haven’t imported it by clicking the Download missing keys button. Clicking that button will open the following dialog:

Many keyservers are setup to share public keys with each other. If the recipient has uploaded their public key to a notable server selecting the default option will stand a good chance of finding the public key you need.

Those who previously imported the recipient’s public key and flagged it as trusted won’t have to worry about the above steps. In either case you’re done. Congratulations, you’ve sent your first encrypted e-mail. Now convince your friends and family members to follow these guides so they can send you encrypted e-mails and decrypt your encrypted e-mails.

CryptoParty Postmortem

I don’t have anything else for you today because last night’s CryptoParty went longer than I expected. The turnout exceeded my expectations by a notable amount so I think we managed to get a good number of people setup with OpenPGP. As it turns out, explaining OpenPGP in two hours isn’t feasible so there is still some fine tuning requires on our behalf but I think we did far better than last time. If anybody reading this has previous CryptoParty experience feel free to comment below or send me an e-mail covering what you’ve learned.

Encrypt Everything: Installing Thunderbird and Enigmail

After a longer than expected break I’m returning to the Encrypt Everything series. Previously I discussed OpenPGP and explained how to generate keypairs in OS X, Windows, and Linux. In this installment I will explain how to install the Thunderbird e-mail client and its Engimail plugin, which enables sending and receiving OpenPGP signed and encrypted e-mails. Be sure you’ve followed the previous guide for your operating system as installing GNU Privacy Guide and generating a keypair is a prerequisite. This guide will apply to OS X, Windows, and Linux.

Step one is to download a copy of Thunderbird. This can be done by going to Mozilla’s Thunderbird website, which should automatically detect what operating system you’re running and provide you with the appropriate binary. If you, like me, run NoScript then separate links for each operating system will be displayed.

OS X

If you haven’t installed GPGTools yet do so.

After GPGTools has been installed download the latest version of Thunderbird from Mozilla’s website. The file you download will be a .dmg. Double-clicking on the file will mount it and you’ll be greeted with the following window:

To install Thunderbird simply drag the Thunderbird icon over the Applications folder shortcut and release the mouse button. That’s it, Thunderbird is installed.

Windows

If you haven’t installed Gpg4win yet do so.

Once you’ve installed Gpg4win download the latest version of Thunderbird from Mozilla’s website. The downloaded file is a standard Windows installer. Double-click on it to start the installation process:

Once the installer has opened click the Next button twice followed by the Install button. Once Thunderbird is installed click the Finish button and you’re done.

Linux

GNU Privacy Guard is installed by default on many Linux distributions but you still need to generate a keypair. If you haven’t generated your keypair yet do so.

As with my previous Linux guide this guide was created using Xubuntu 13.04, which includes Thunderbird as the default e-mail client. Likewise, according to Ubuntu’s website, Thunderbird has been the default e-mail client since version 11.10. According to this guide Thunderbird is also included by default on Fedora Core.

Therefore, if you’re using any of the distributions this guide is applicable to, you already have Thunderbird installed. Wasn’t that easy?

Installing Enigmail

Now that you have Thunderbird installed you will need to install the Enigmail plugin. Doing so is simple thanks to Thunderbird’s built-in ability to find and install plugins. The following steps apply to OS X, Windows, and Linux. Screenshots will be taken on an OS X virtual machine because it is my default operating system.

First, if you are running OS X or Linux, go to the Tools menu and click Add-ons:

If you are running Windows click the menu button on the right-hand side of Thunderbird (next to the search box) and click Add-ons:

This will open the Add-ons Manager tab:

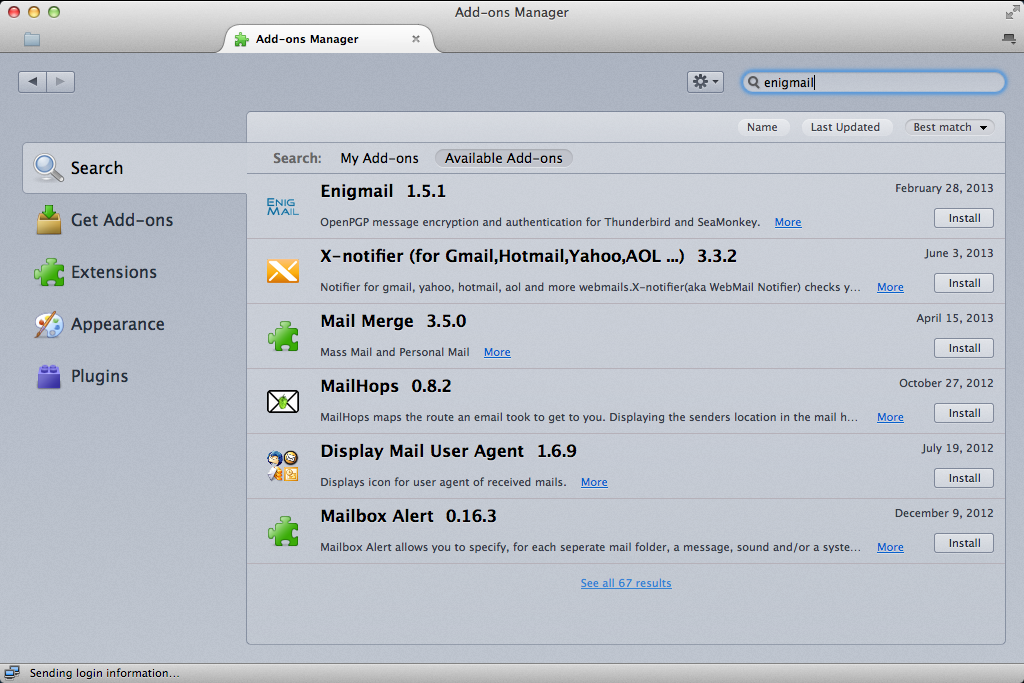
See the box in the upper right-hand corner of the tab labeled “Search all add-ons”? Enter “enigmail” into it and hit the enter key. You will get a list of available plugins:

The Enigmail plugin will likely be the first result:

Click the Install button to begin the installation process. You will see a progress indicator:

Once Enigmail has been downloaded and installed you will be asked to restart Thunderbird:

That’s it, you’re setup and ready to begin sending OpenPGP signed and encrypted e-mails. As you can guess sending actual e-mails will be the topic of the next Encrypt Everything installment.

Make the NSA Pay, Encrypt and Anonymize Your Communications Today

As it turns out there is yet another reason to encrypt and anonymize your communications, it will directly cost the National Security Agency (NSA):

Using online anonymity services such as Tor or sending encrypted e-mail and instant messages are grounds for US-based communications to be retained by the National Security Agency even when they’re collected inadvertently, according to a secret government document published Thursday.

The document, titled Minimization Procedures Used by the National Security Agency in Connection with Acquisitions of Foreign Intelligence, is the latest bombshell leak to be dropped by UK-based newspaper The Guardian. It and a second, top-secret document detail the circumstances in which data collected on US persons under foreign intelligence authority must be destroyed or can be retained. The memos outline procedures NSA analysts must follow to ensure they stay within the mandate of minimizing data collected on US citizens and residents.

While the documents make clear that data collection and interception must cease immediately once it’s determined a target is within the US, they still provide analysts with a fair amount of leeway. And that leeway seems to work to the disadvantage of people who take steps to protect their Internet communications from prying eyes. For instance, a person whose physical location is unknown—which more often than not is the case when someone uses anonymity software from the Tor Project—”will not be treated as a United States person, unless such person can be positively identified as such, or the nature or circumstances of the person’s communications give rise to a reasonable belief that such person is a United States person,” the secret document stated.

The more encrypted and anonymized data sent across the Internet the more hard drives the NSA has to buy. Do your duty to cost the NSA money, encrypt and anonymize your data today.

Oh, and it goes without saying but, the NSA is certainly lying when it claims it ceases surveillance upon determining a target is within the United States. This is the same agency that claimed it wasn’t spying on American citizens while it was spying on American citizens.

Minnesota Pirate Party CryptoParty

On Tuesday, June 25th the Minnesota Pirate Party will be hosting its second CryptoParty. For those of you who aren’t signed up with Facebook, the event will be held at the Churchill Apartments located at 111 Marquette Ave. South in Minneapolis, Minnesota. To gain entry ring apartment #483.

At this event we will go over public-key cryptography, how to setup OpenPGP to encrypt e-mail, and how to use Off-the-Record Messaging to encrypt instant messages. Everybody is welcome even if you work for a three letter government agency that has been caught spying on American citizens (in fact agents of that agency are encouraged to attend so we can emasculate you by demonstrating how futile your spying efforts are).

Encrypt Everything: Using GPG on Linux

Now that I’ve explained how to use GNU Privacy Guard on OS X and Windows it’s time to cover Linux. Writing a tutorial on Linux is slightly more difficult because different distributions have different ways of doing things, which means I have to limit this tutorial’s scope. This tutorial is aimed at users running mainstream distributions based on Red Hat and Debian. I wrote this tutorial using Xubuntu 13.04 and looked up Fedora Core specific instructions. This tutorial is known to work on Xubuntu, all but entirely guaranteed to work on Ubuntu, and most likely applicable to Fedora Core. The good news is GNU Privacy Guard is in the standard installation of Debian and Fedora-based distributions meaning you don’t have to install it manually if you’re running Debian, Ubuntu, Xubuntu, Kubuntu, Fedora Core, or Red Hat. I will explain how to install Seahorse, a graphical GNU Privacy Guard front end for Gnome and Xfce.

The first thing you need to do is install Seahorse. On Debian-based systems, such as Ubuntu, you will need to open a terminal and enter the following command:

sudo apt-get install seahorse

On Red Hat-based systems, such as Fedora Core, you will need to open a terminal and enter the following command:

su -c "yum install seahorse"

Seahorse should now be installed. It may or may not be automatically added to your application menu, depending on the distribution you’re running however the application can be launched from all systems by entering the following command in a terminal:

seahorse

You will be greeted with Seahorse’s main screen:
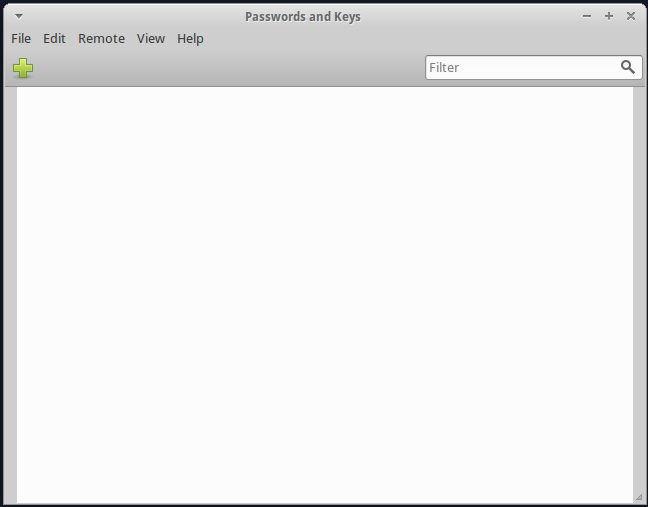
Generating a new OpenPGP key pair is easy. First, click on the green plus button. You will be asked what type of key you want to create:
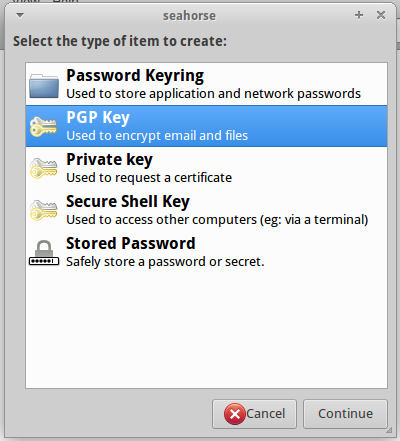
Select PGP Key and click the Continue button. You will now be presented with a dialog where you can enter the key pair information:
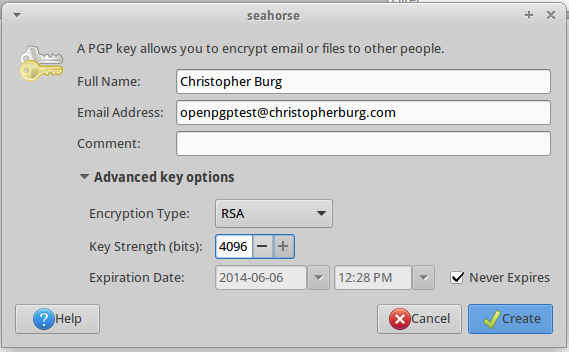
Although it’s not necessary I do recommend click the little triangle next to Advanced key options so you can manually enter a key pair length. By default it’s set to 2048 and I recommend you max it out to 4096 but you’re not required to. Whether you want to manually enter a key pair length or not you should fill in your identifying information. For this example I entered my name into the Full Name field and openpgptest@christopherburg.com into the Email Address field. Once you’ve entered your desired information click the Create button.

You will now be asked to enter a passphrase:
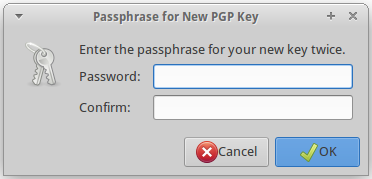
Enter a strong passphrase[1] as it will be used to encrypt your private key, which will prevent it from being used should it fall into unwanted hands. Remember, whoever possess the private key can use it to sign or encrypt data. If a malicious user was able to obtain and decrypt your private key they could impersonate you. After you’ve entered your passphrase into both fields click the OK button. Now comes the fun part, waiting for your key pair to be generated:
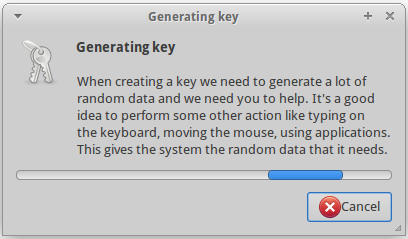
For some reason generating a key pair in Linux took much longer than generating a key pair in either OS X or Windows. It took my system approximately 20 minutes to generate the key pair. During this time Seahorse is waiting to collect enough random data, which will occur faster if you use other applications. After doing some research online I found several methods that are supposed to decrease the amount of time needed to collect enough random data. The most common recommendation I came across was an application called Entropy Gathering Daemon. I didn’t have time to download, install, and test it so I will leave you to experiment with it if you want.

After the key pair has been generated it will appear in your list of keys:
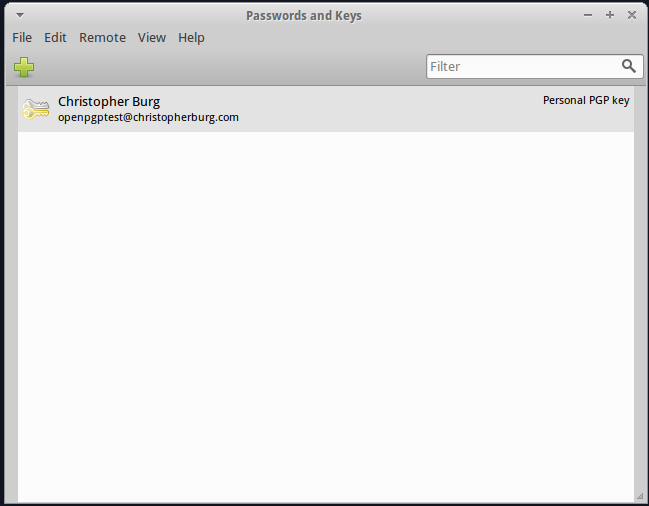
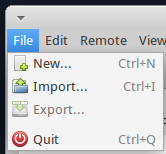
That’s it, you now have an OpenPGP key pair to encrypt and sign e-mails. Now you need to know how to import the public keys used by those you correspond with. Importing a key is easy. First, you need to obtain a copy of the public key you want to input. For this example I will use the public key for blog [at] christopherburg [dot] com. If you obtained a copy of the public key in text format paste it into a text file with a name that ends in .asc. Now go to the File menu and click Import:
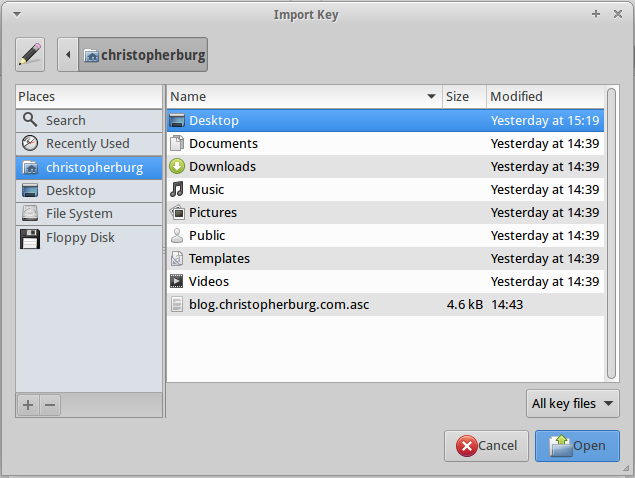
In the Import Key dialog box select the .asc file containing the public key. For this example I named the file blog.christopherburg.com.asc:
A dialog box will present information from the key being imported:
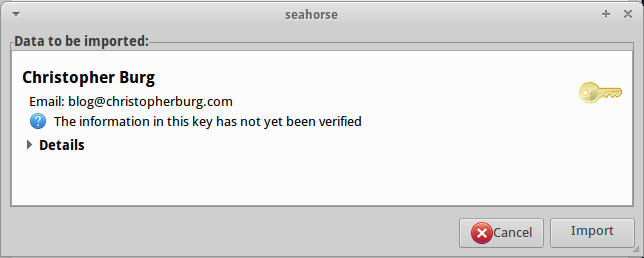
If you want to see all the details click the little triangle next to Details. Once you’re satisfied that the details are correct click the import button. You will be returned to Seahorse’s main screen but the key won’t be listed. In order to see imported keys you need to go to the View menu and select Show any:

Now you will see all the keys Seahorse knows about:
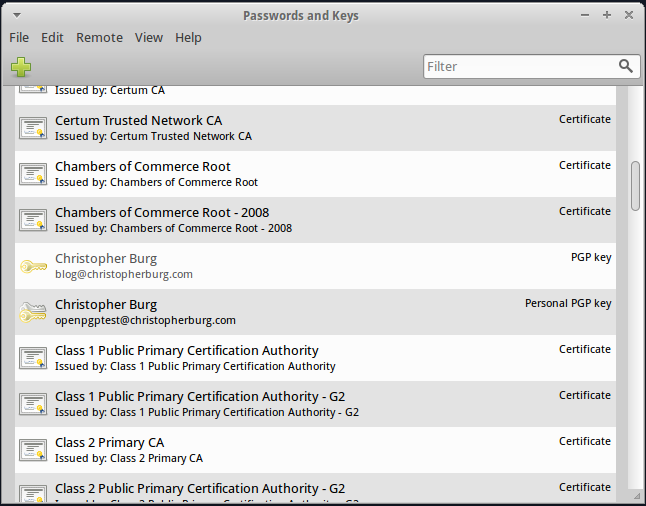
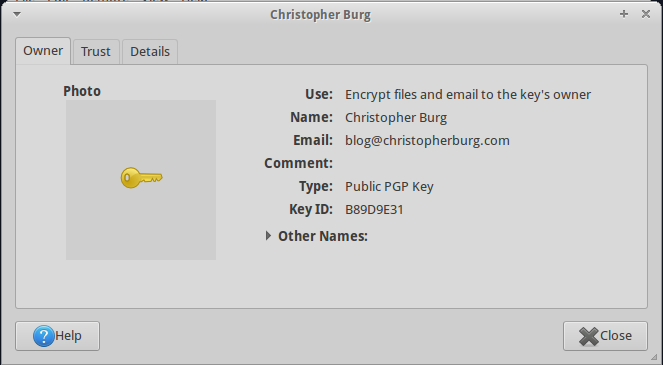
As you can see the public key for blog [at] christopherburg [dot] com is listed but isn’t trusted. If you double-click on the key you can open a dialog box that will list the key’s details:
If you click on the Trust tab you can check the box labeled I trust signatures from ‘Christopher Burg ‘ on other keys:
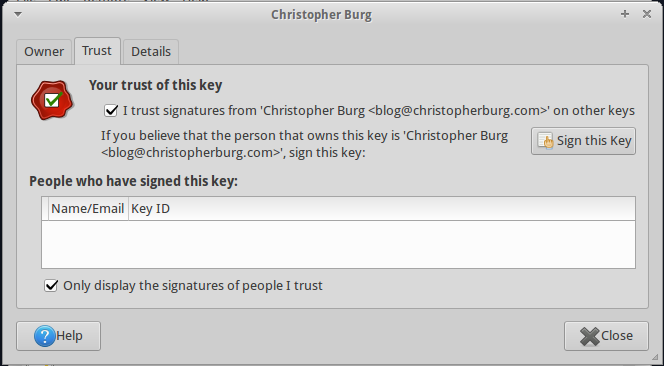
Now the key will show up in your list of trusted keys. If you so desire you can sign the public key with your private key. Signing a public key is a way of alerting other people that you have verified that the person with the corresponding private key is who he says he is.

That’s how you setup OpenPGP key pairs in Seahorse. Now that we’ve covered methods to generate OpenPGP keys on OS X, Windows, and Linux we can move onto using Thunderbird and Enigmail to send encrypted and/or signed e-mails and decrypt and/or verify signatures on e-mails, which will be covered in the next tutorial.